
Gloria winter bag

Make it stand out
Whatever it is, the way you tell your story online can make all the difference.
Intro
I have created Gloria winter bag so it will go with the many different coloured boots I have for the winter. It will match all the colours I own. I have used acrylic yarn I have already had in my stash. The colour palette is mainly earth muted tones.
As Earth tones are most suitable for autumn and winter I have used this palette. If you are making this bag for the summer, use bright colours that will reflect the season and of course cotton yarn.
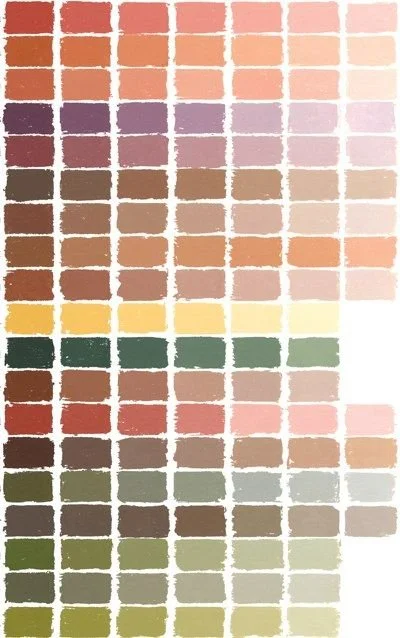
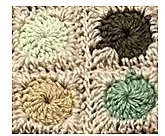
If you are not familiar with the Earth tones colour scheme I have enclosed a photo of different shades. The colours are muted:
Yarn used
For this project I have used double crochet yarn by many brands available as I had all yarn at home as a leftover from other projects. However, I have included only Stylecraft which has a large palette of colours
No.
COLOUR
Brand and code
Write your alternatives
1.
Stone – main colour
Stylecraft special dk - 1218 Parchment
2.
Burgundy
Stylecraft special dk -1035 - Burgundy
3.
Purple
Stylecraft special dk - 1425 – Emperor
4.
Dark brown
Stylecraft special dk - 1054 – walnut
5.
Light brown
Stylecraft special dk - 1064 – Mocha
6.
Beige
Stylecraft special dk - 1710 – stone
7.
Warm beige
Stylecraft special dk 1420 – camel
8.
Brown mustard
Stylecraft special dk - 1806 – gingerbread
9.
Mustard
Stylecraft special dk - 1709 – gold
10.
Yellow
Stylecraft special dk - 1856 – dandelion
11.
Dark lime
Stylecraft special dk - 1712 – lime
12.
Brick
Stylecraft special dk - 1029 – copper
13.
Coral
Stylecraft special dk - 1836 – vintage peach
14.
Dark coral
Stylecraft special dk - 1083 – pomegranate
15.
Dark orange
Stylecraft special dk 1723 – tomato
16.
Lake green
Stylecraft special dk - 1725 – sage
17.
Green
Stylecraft special dk - 1824 – cypress
18.
Army green
Stylecraft special dk - 1027 – khaki
19.
Bottle green
1009 – bottle green
20.
lake blue
Stylecraft special dk - 1722 – storm blue
21.
dark blue
Stylecraft special dk - 1302 – denim blue
22.
strong blue
Stylecraft special dk - 1003 – aster
23.
navy
Stylecraft special dk - 1011 – midnight
24.
dark mint
Stylecraft special dk 1842 – spearmint
25.
mint
Stylecraft special dk 1820 – duck egg
26.
light grey
Stylecraft special dk 1203 – silver
Yarnage: total – 400 g - - 1288yds/1180m
322yds/295m per 100g
18 colours - 10 g
Stone 70g
7 colours -20g
Mustard 20g
Green 20g
Purple 20g
Brick 20g
Blue 20g
Brown 20g
Burgundy 20g
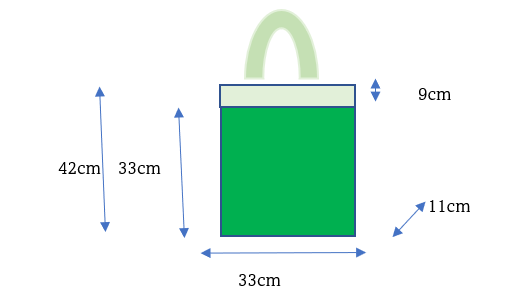
Dimensions
One motif is 5.5cm
Width – 33cm
Height 33cm
Border 9cm total height 42cm
Depth 11cm
Handle 55cm – only 50cm are visible
Dimensions
Stitches used
Stitch
USA terminology
UK terminology
Chain
ch
ch
Slip stitch
Sl st
Sl st
Linked single/ double crochet
Linked single crochet lsc
Linked double crochet ldc
Hdc/htc
Half double crochet hdc
Half treble crochet htc
Dc/tc
Double crochet dc
Treble crochet tc
Tc/dtc
Treble crochet tc
Double treble crochet dtc
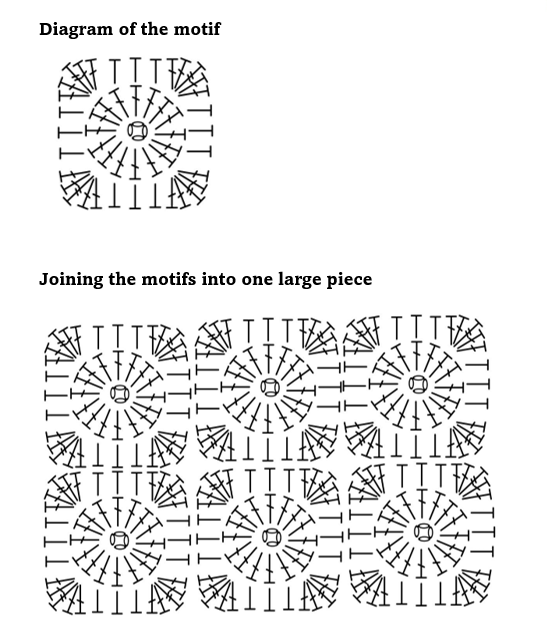
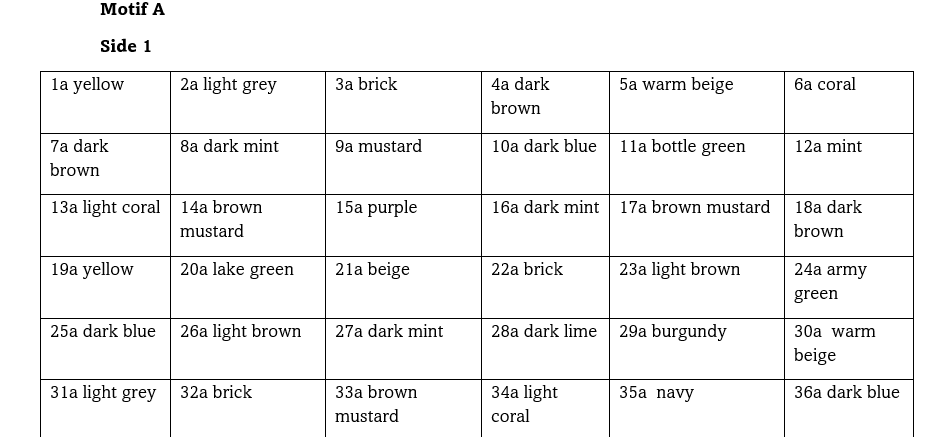
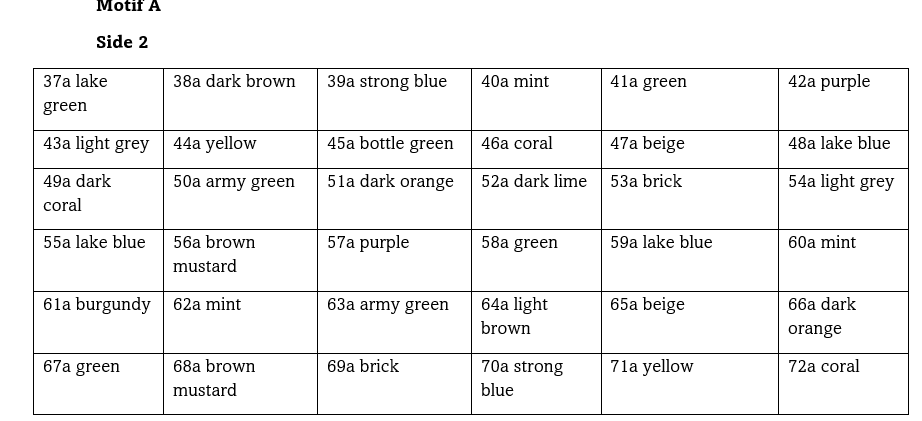
Motif
Pattern below
Written pattern
Round
USA terminology
UK terminology
Chain 4 and slip st in the first ch to make a ring
Chain 4 and slip st in the first ch to make a ring
1
Make 16 dc in the chain and slip st in the first dc
Cut the yarn and weave end
Make 16 tc in the chain and slip st in the first tc
Cut the yarn and weave end
2
Attach the yarn in any dc.
(Make 2 dc, 1 tc, 2 dc in one stitch to make the corner of the motif
Make a hdc in the next 3 stitches)
Repeat this pattern for 3 more times
Slip stitch in the first dc of the round.
Cut the yarn and weave the ends
Attach the yarn in any tc.
(Make 2 tc, 1 tc, 2 tc in one stitch to make the corner of the motif
Make a htc in the next 3 stitches)
Repeat this pattern for 3 more times
Slip stitch in the first tffffc of the round.
Cut the yarn and weave the ends
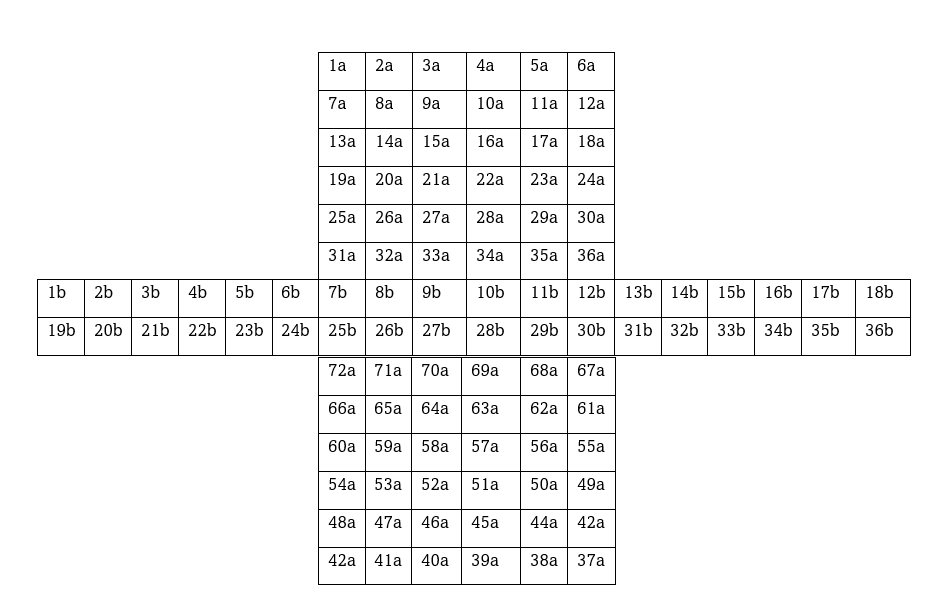
Instructions for the bag
We need to make 36 motifs for the front of the bag
36 motifs for the back of the bag
And
36 motifs for the sides and bottom of the bag
The front and back of the bag are made with motif A - beige – round 1 and contrast colour round 2
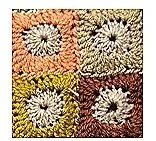
The motifs for the sides and bottom of the bag are made with motif B– contrast colour – round 1 and beige – round 2
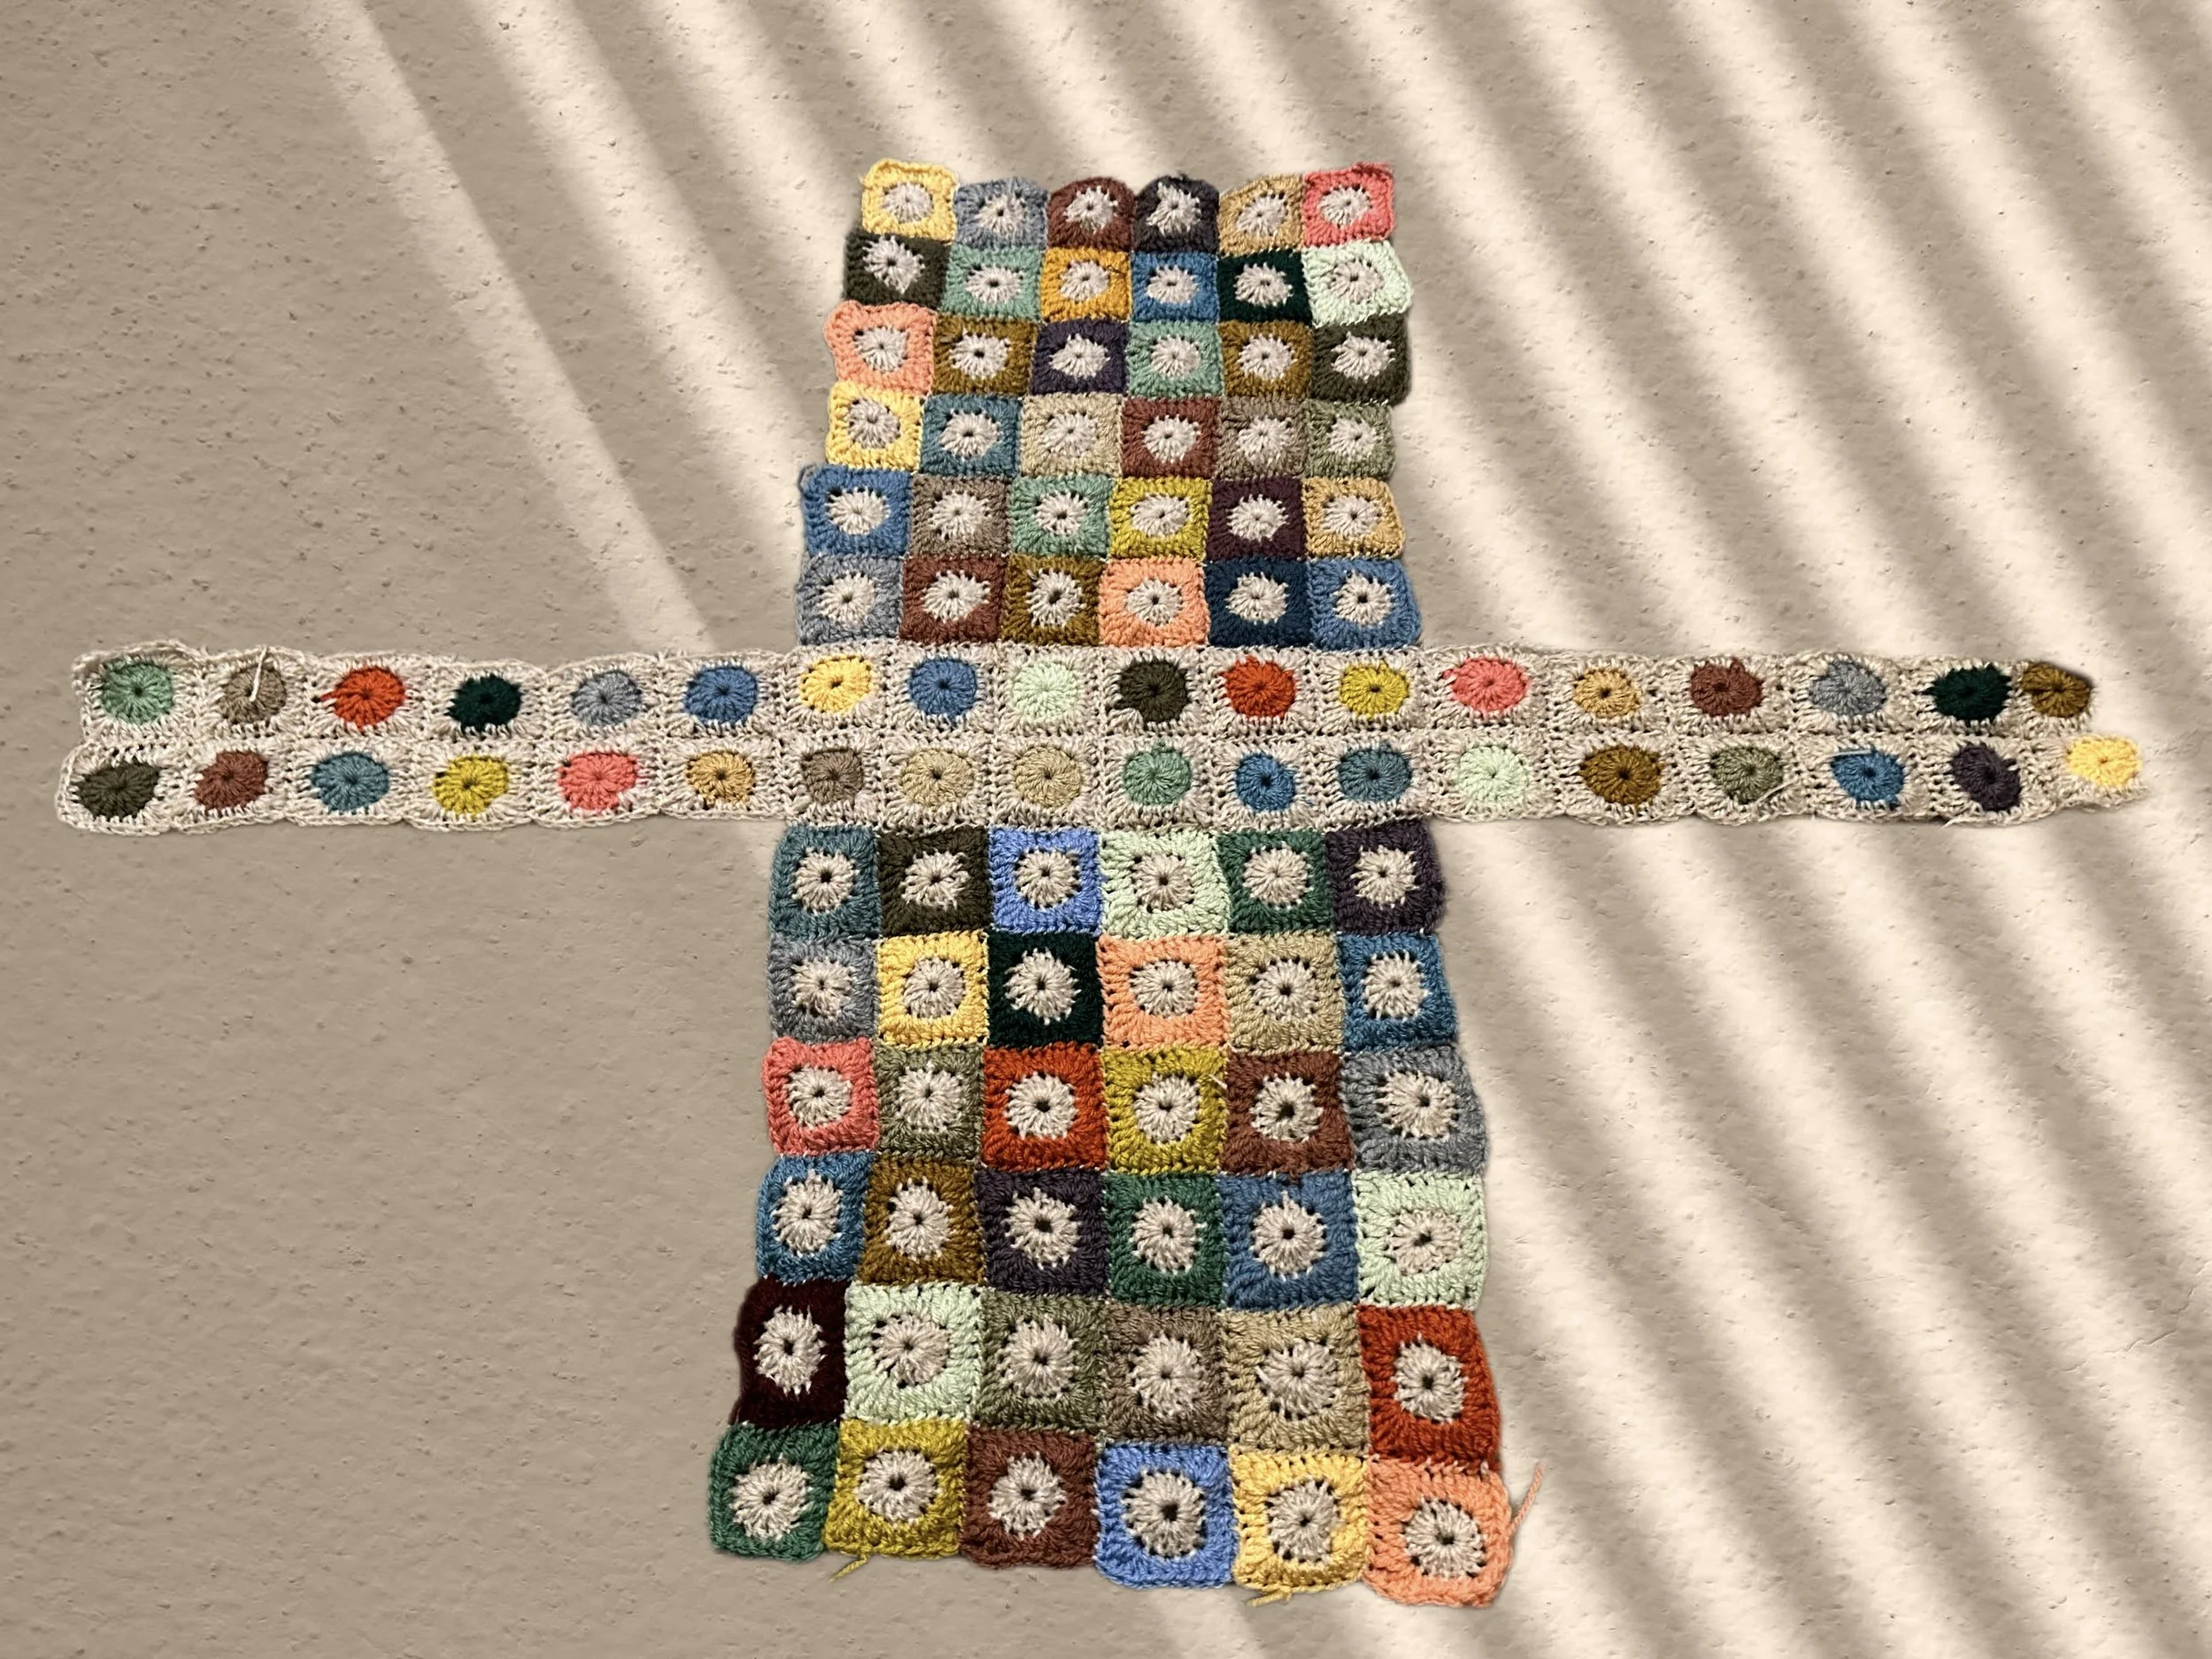
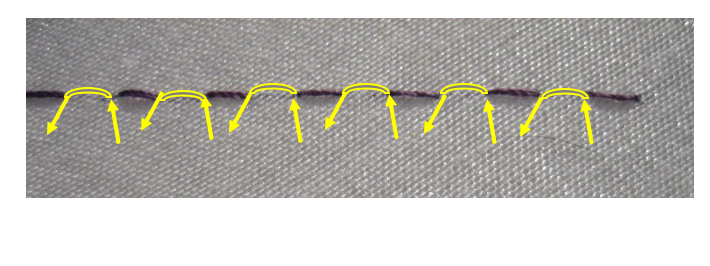
Joining the motifs
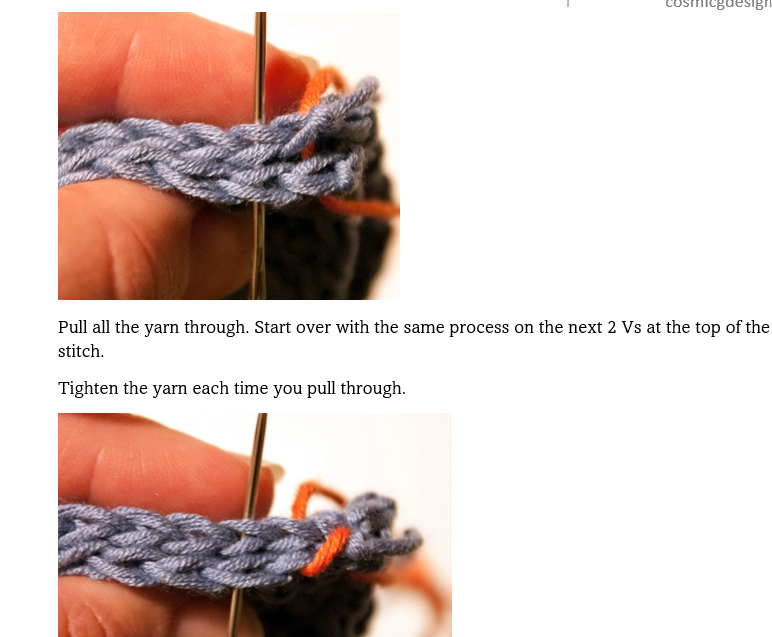
I have joined the motifs with Whip stitch.
If you are not familiar with this sewing technique please read below.
You will need a sharp large eye needle to thread the yarn in.
We use the stone main colour yarn for the sewing.
We align both motifs with the wrong side out i.e. the right sides of both motifs are facing each other.
The tc/dtc from one motif should align with the tc/dtc from the other motif, the dc/tc should align with the dc/tc and so on.
We put our needle through the 2 Vs on the top from both motifs. Leave a long tale for weaving.
We always put the yarn through the Vs from the same side.
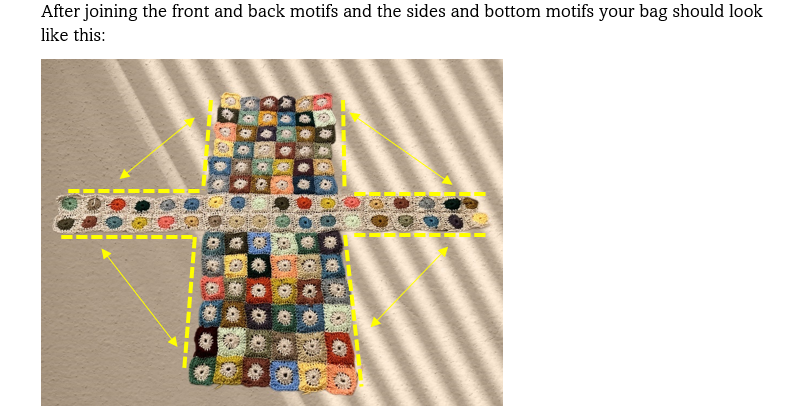
We join all sides of the bag as shown above in order to make a large rectangle i.e. a bucket bag.
Bag handles
We chain 80 and work linked sc/dc
Colour palette for handles
Mustard
Green
Purple
Brick
Blue
Brown
burgundy
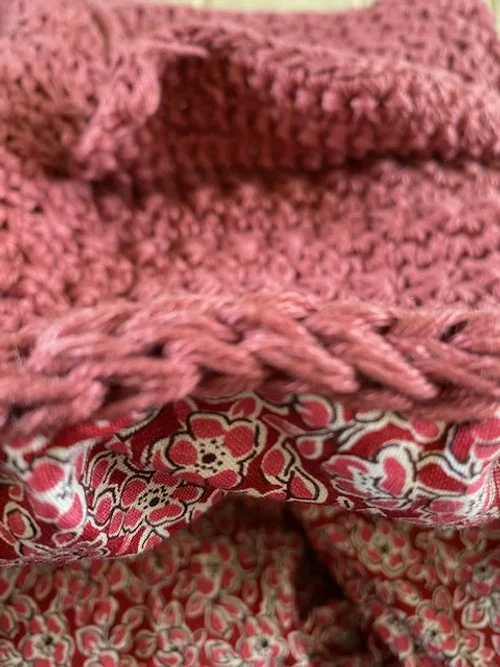
We attach the handles to the bag by sewing them into the border of the bag. More on joining the handle is included in the border section.
Border
For each motif we make 9 sc/dc.
We have 162 stitches in our first row.
We attach each additional colour and work linked sc/dc. We work the colour palette twice -14 rows.
Colour palette for handles
Mustard
Green
Purple
Brick
Blue
Brown
Burgundy
Openings for the handle
In our first round of colours for the border as we finish as the burgundy colour we need to make the opening for the handle.
At the burgundy colour we need to make opening for the handle. They are placed above the first and the second motif i.e. for the front/back we have 9 motifs x 9 sc/dc we have 81 stitches per side
Make 5 linked sc/dc make a chain of 8 and skip 8 stitches. Continue with 37 linked sc/dc.
Do the sides (18 stitches) and we start the other side of the bag = make 5 linked sc, chain 8, skip 8, 37 linked sc/dc, chain 8, skip 8, make final 5 linked sc/dc.
The stitches of the border are included in the below diagram.

We then continue with the second set of rows of our colour palette.
Attaching the handles is quite easy.
We place the bag flat. We put the ends of our handle through the slip openings of the border. With pin we attach them to the bag.

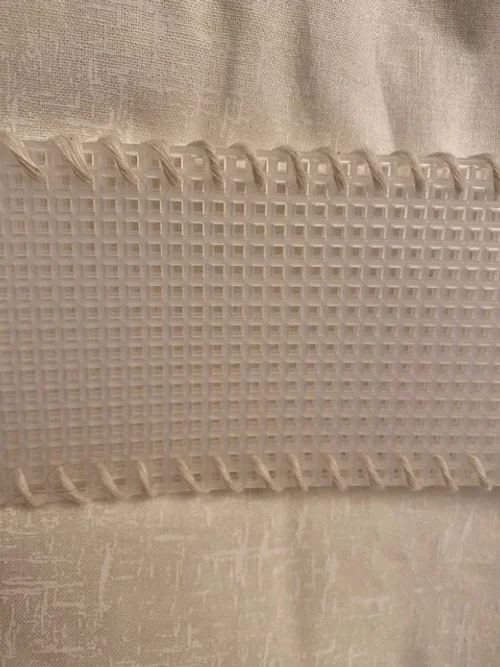
Plastic canvas bottom
For the bottom of the bag I used plastic canvas. The plastic canvas can be purchased on amazon as a set of 1,2,5 or 12 sheets size A4.

I cut the canvas to match the dimensions of the bottom of the bag i.e. the size of 12 motifs.
I have doubled it by joining the two cut plastic canvases together:
Then, I lined the plastic canvas with material i.e. I simply wrapped the canvas in the fabric and secured the fabric with whip stitch. I then, attach the fabric plastic canvas by making a knot for the 4 corners of the canvas to the 4 corners of the base of the bag. The stitching should face the bottom of the bag i.e. the side of the bag that does not have stitches is the one that will face upwards.
Lining – optional.
For this, you can use any fabric. I strongly recommend upholstery fabric as it gives firmness to the bag.
We first double the fabric making a large rectangle with the right side facing in. We cut the fabric into shape including the bottom of the bag.
The size of the doubled fabric should measure the height, width and depth of the bag plus an inch and a half. We add plus in the dimensions in order to have space to sew the fabric together.
We attach the yarn at the far bottom corner of the fabric including both pieces of fabric.
We go up and down on both pieces of fabric making a straight line as shown below:
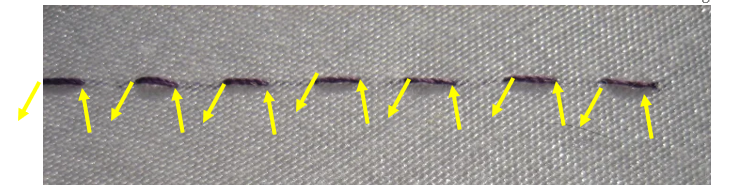
Once we have gone through the 3 sides of the fabric (leaving the bag opening unworked) we go back and use the same stich again. But where we have done down with our needle, we go up to fill in the gaps between the stitch in the first round.
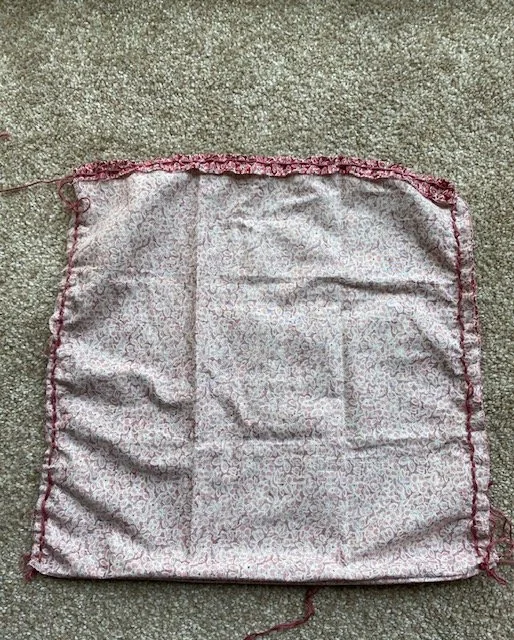
If you have a fabric that the bottom is joined there is no need to sew in the bottom of the fabric even though it will make it more sturdy.
Once we have done 3 sides of the fabric TWICE, we have the top of the bag opening unstitched.
We will need to stitch this separately i.e. front fabric and back fabric so we have the bag opening OPEN.

We fold the top front part separately from the back part. The folded part should be on the wrong side leaving the inside of the bag without the folding showing.
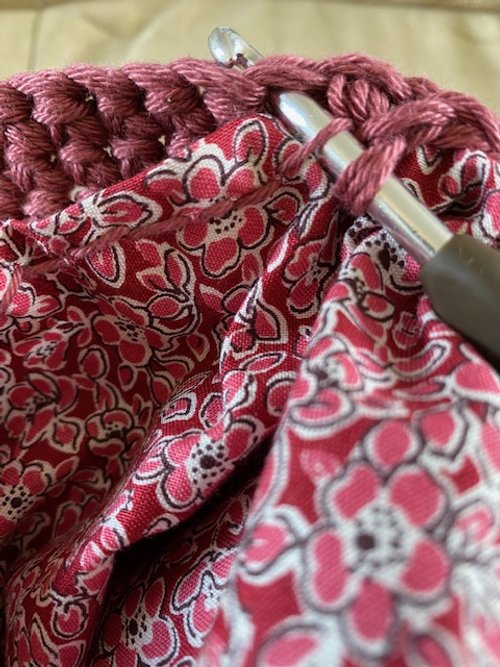
All the loops we make on the bag opening of the fabric are a crucial part of joining the crocheted bag to the lining.
We use slip stitch by going into a loop of the fabric and a stitch of the crocheted bag.
if we have more loops on the fabric than the crocheted piece, we use the same stitch twice into one loop.
If we have more stiches on the crocheted piece than the loops on the fabric we use one loop twice.
This will not be noticeable.
All done.
Happy crocheting!
Gordana x