
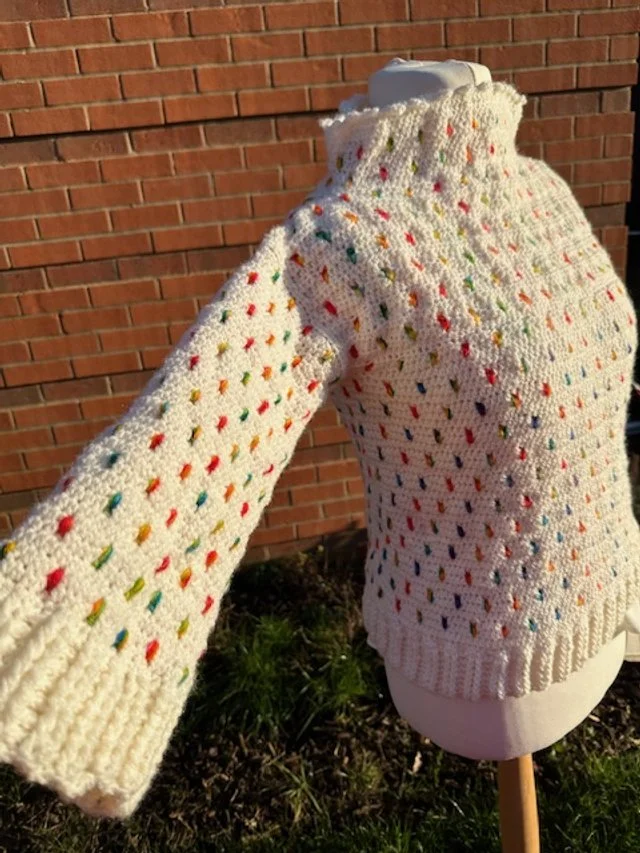
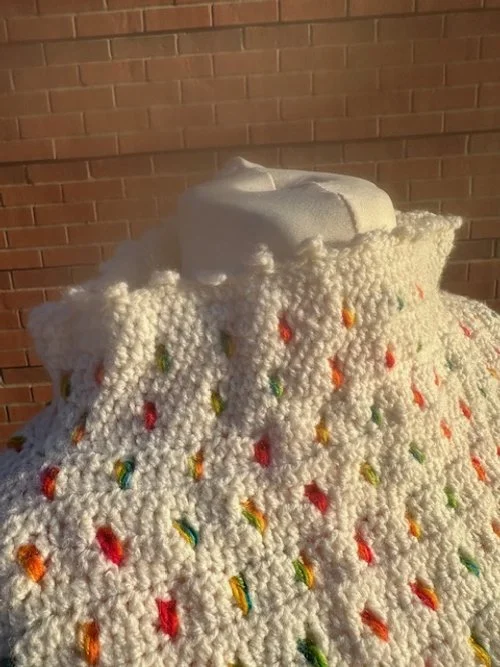
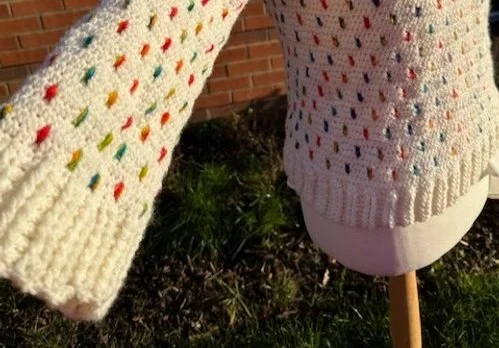
Rainbow in the snow jumper
Copyright notice - PLEASE READ
If you use any of the free patterns to reproduce CosmicGDesigns items or your own designs based on the CosmicGDesigns patterns and sell them I would appreciate if you mention the website I.e. the original designer Gordana Adamceska-Halson.
Please do not copy, screen shot and distribute the diagrams, diagrams or sketches to other website and social media. They are for personal use only. If you reference my work please clearly indicate the website. Thank you Gordana
Intro
The jumper is made of premium acrylic yarn. It depicts rainbow in the snow as it reflects from the sun. The jumper is very soft, comfortable and trendy. It can be sized up or down very easily instructions included in the written pattern.
Whether you wear it with jeans for daily chores or dress it up with a nice pair of trousers it’s a statement piece.
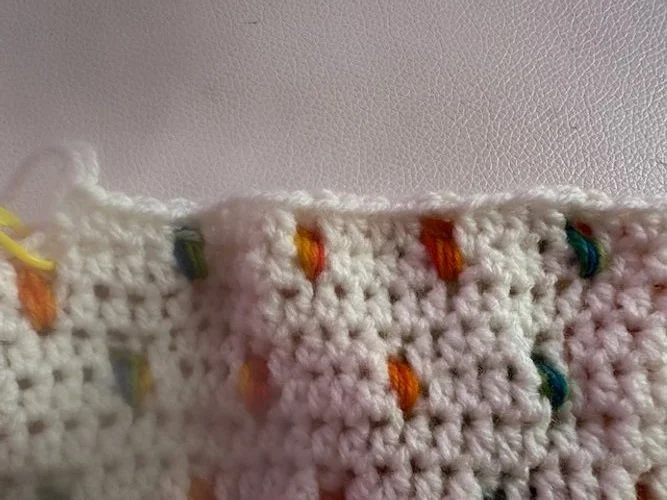
Its good to mention that the pattern is reversable in a very unique way. See photo below 😊
I should make one pattern with the reverse side probably.
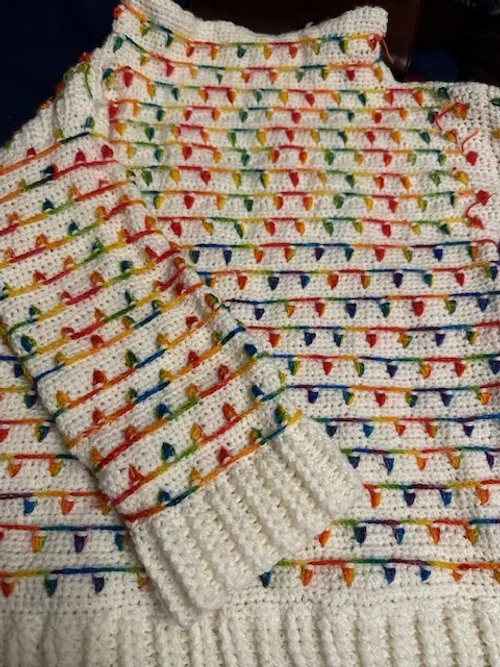
Wrong side
Reversable
I hope you like it.
The pattern is written In both UK and USA crochet terminology. The Uk terminology is in bold.

Instructions
Hook 4mm
Yarn used
I have used Utopia yarn which is dk yarn and 4 ply hand dyed yarn by cosmicgdesigns. You can of course use yarn of your choice. And for the clusters you can also use dk.
Utopia yarn – ivory 300g, 900m
Hand dyed 4ply yarn merino – 70 g, 300m
For the 4 ply yarn you can always substitute with dc yarn or 4 ply yarn which had quick changes of colour/or gradual change of colour – any sport, sock or dk yarn.
The bigger the contrast of the colours the larger the effect of the fabric.
Tension / gauge
10cmx10cm (4’x4’) = 17 st x20 rows
Stitches used
USA Terminology
UK Terminology
Hdc/htc
Half double crochet hdc
Half treble crochet htc
Yarn over
Yarn over yo
Yarn over yo
Cluster st of 3
Yo, go in the stitch, yo, pull through the st, pull through 2, 2 loops on your hook,
Repeat 3 times – you will have 4 loops on your hook
Pull through all 4
Yo, go in the stitch, yo, pull through the st, pull through 2, 2 loops on your hook,
Repeat 3 times – you will have 4 loops on your hook
Pull through all 4
Slip stitch
Sl st
Sl st
Ch
Chain ch
Chain ch
Picot stitch
Make a sc, ch 4, and slip stitch oin the sc,
Sl st in the next 3 st
Repeat from the beginning
Make a dc, ch 4, and slip stitch oin the sc,
Sl st in the next 3 st
Repeat from the beginning
Fpdc /fptc
Front post double crochet fpdc
Front post treble crochet fptc
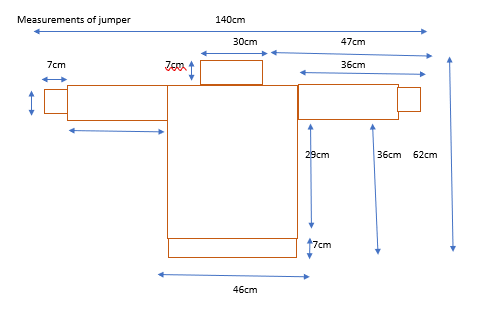
Measurements of the jumper

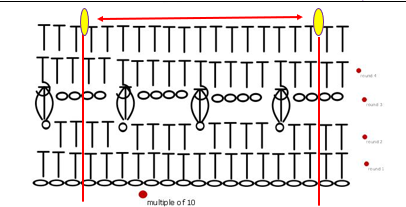
Crochet Pattern - in the round
Written pattern and photo guide
Round
USA Terminology
UK Terminology
Chain multiples of 10
I have chained in total of 170 – this will be comfortable fit for bust of 100cm.
Sizing and modifying the jumper is easy.
If you would like a smaller jumper reduce by 10 and if you would like your jumper to be bigger add 10, 20 etc.
If you would like the jumper to become tunic and be longer make more rows by adding 4 more rows of the pattern sequence. If your would like the jumper to be shorter make less rows by cutting 4 rows of the pattern.
Please note we work in the round for this part
We also do not cut the yarn
For the next round for each colour we chain 3 to level up on the next round
Chain 3 to level up the needed yarn
Carry the rainbow yarn by chaining 2 or 3 chains
Round 1
Make hdc in each chain, at the last stitch put a stitch marker and continue to work round 2 immediately (no slip stitch as that will end the round – the whole jumper is worked in the round)
Make htc in each chain, at the last stitch put a stitch marker and continue to work round 2 immediately (no slip stitch as that will end the round – the whole jumper is worked in the round)
Round 2
Main colour
Make hdc in 4 stitches, ch 1, skip 1 (repeat until the end of the round)
Main colour
Make htc in 4 stitches, ch 1, skip 1 (repeat until the end of the round)

Arrows indicate the skipped stitches i.e. ch 1, skipped 1
Round 3
Rainbow yarn
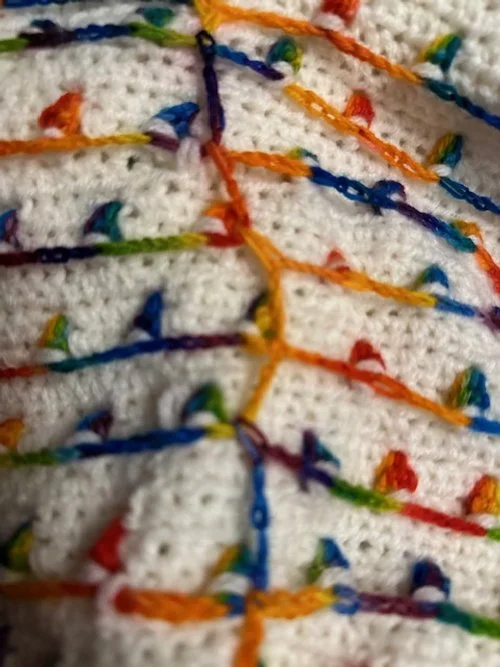
(Make the cluster stitch in the skipped ch space by working into the round 1 of the pattern – the cluster is your first stitch of round 3
Chain 4, skip 4 hdc below)
repeat until the last ch 4 before the first cluster we have made
after the ch 4 continue with round 4
Rainbow yarn
(Make the cluster stitch in the skipped ch space by working into the round 1 of the pattern – the cluster is your first stitch of round 3
Chain 4, skip 4 htc below)
repeat until the last ch 4 before the first cluster we have made
after the ch 4 into the cluster continue with round 4
Cluster round is worked in the skipped st
Round 4
Main colour (Make fpdc in the cluster st, make hdc in the next 4 st) repeat until the last st - continue with round 1
Main colour
(Make fptc in the cluster st, make htc in the next 4 st) repeat until the last st - continue with round 1
Front post st in the cluster
Repeat rounds 1-4 until you have done 44 rows or 11 repeats of the of the pattern.
Here if you would like the jumper to be shorter – make fewer rows.
And if you would like longer jumper make more rows.
Sleeve openings
Once you have done 44 rows we have reached the underarm.
Sizing down – if you are of smaller stature please reduce the number of rows by 4 allowing for border.
Sizing up – if you are tall please add 4 more rows.
Here we need to make the sleeve openings.
Put the fabric laying flat and put stitch markers at the end of the fabric – this is where our sleeve openings will be.
We put a stitch marker where the 4 hdc are, after 2 hdc we place the stitch marker. Therefore at the end of our row we have only 2 hdc and not 4.
We work back and forth the 4 rows between the stitch markers.
The pattern for this is shown below.
Once you have done 44 rows we have reached the underarm.
Sizing down – if you are of smaller stature please reduce the number of rows by 4 allowing for border.
Sizing up – if you are tall please add 4 more rows.
Here we need to make the sleeve openings.
Put the fabric laying flat and put stitch markers at the end of the fabric – this is where our sleeve openings will be.
We put a stitch marker where the 4 htc are, after 2 htc we place the stitch marker. Therefore, at the end of our row we have only 2 htc and not 4 as per the original pattern.
We work back and forth the 4 rows between the stitch markers.
The pattern for this is shown below.
Sleeve openings
We continue the pattern in following row pattern ending and starting with 2 hdc/htc.
We have cut the pattern short in order to make the sleeve openings.
We work the front of the jumper back and forth (between the red arrow as shown in the diagram above) for 30 rows.
We repeat the same for the back of the jumper.
—————————————————————
Once these 30 rows are made back and front – please make sure that the sleeve openings is large enough for your arm.
If its not – please make additional 5 rows front and back and measure if it fits.
Once we have finished our 30 rows we join the top of the sleeves as follows
We turn our work inside out – the wrong side.
We take a large eye needle and mattress stitch each stitch at the top of our jumper.
We mattress stitch 15 stitches only on both sides of our work.
We have now completed the top of our shoulders.
We leave large gap for the neck as the design requires for the turtle neck to be wide – and the stiffness of our fabric makes it stand upright.
——————————————————————————————————-
We place 2 hdc/htc in each row – diagram below.
We have 30 rows back and 30 rows front.
We have 30 rows back and 30 rows front. This will give us 60 stitches for the sleeve opening.
We continue the original pattern in the round for as long as your arms are long allowing for border. I have done 14 repetitions of work in the round or 56 rounds.
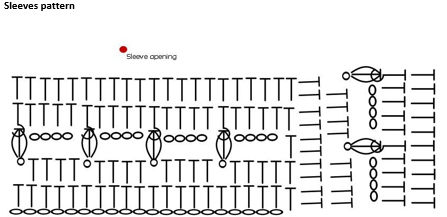
Sleeve patten
Collar
We work in round for this part
We continue the pattern in the round. We add 8 rows from the pattern.
We also make additional 1 row of hdc.
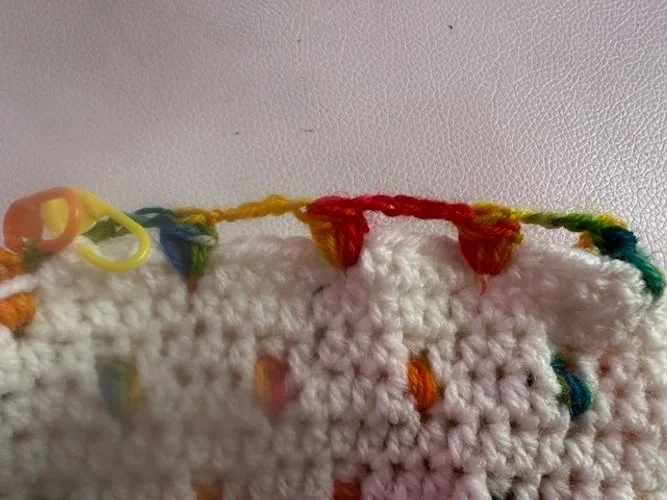
Once this is done – we proceed to make picot stitch.
(We make sc, ch 4, slip st in the sc,
Sl st in the next 3 st)
We repeat this pattern until the last st.
We work in round for this part
We continue the pattern in the round. We add 8 rows from the pattern – 2 pattern sequences.
We also make additional 1 row of htc.
Once this is done – we proceed to make picot stitch.
(We make dc, ch 4, slip st in the sc,
Sl st in the next 3 st)
We repeat this pattern until the last st.
Wide neck collar with picot ending
Sleeve ridging
For the cuffs and border we use basic ribbing consisting of (we work in the round)
(Fpdc in 2 st, bpdc in the next 2 st)
We repeat this until the end of the round.
We make 7 rounds for both cuffs and border.
For the cuffs and border we use basic ribbing consisting of (we work in the round)
(Fptc in 2 st, bptc in the next 2 st)
We repeat this until the end of the round.
We make 7 rounds for both cuffs and border.
Note
If you are of large stature and your arms are longer make more rounds of the ribbing.
Same applies if you are of smaller stature – make less rounds of the ribbing.
Sleeves ridges and bottom ridges
All done! Happy crocheting Gordana xx
Designed January 2024
Written January 2024
By cosmicgdesigns.com