
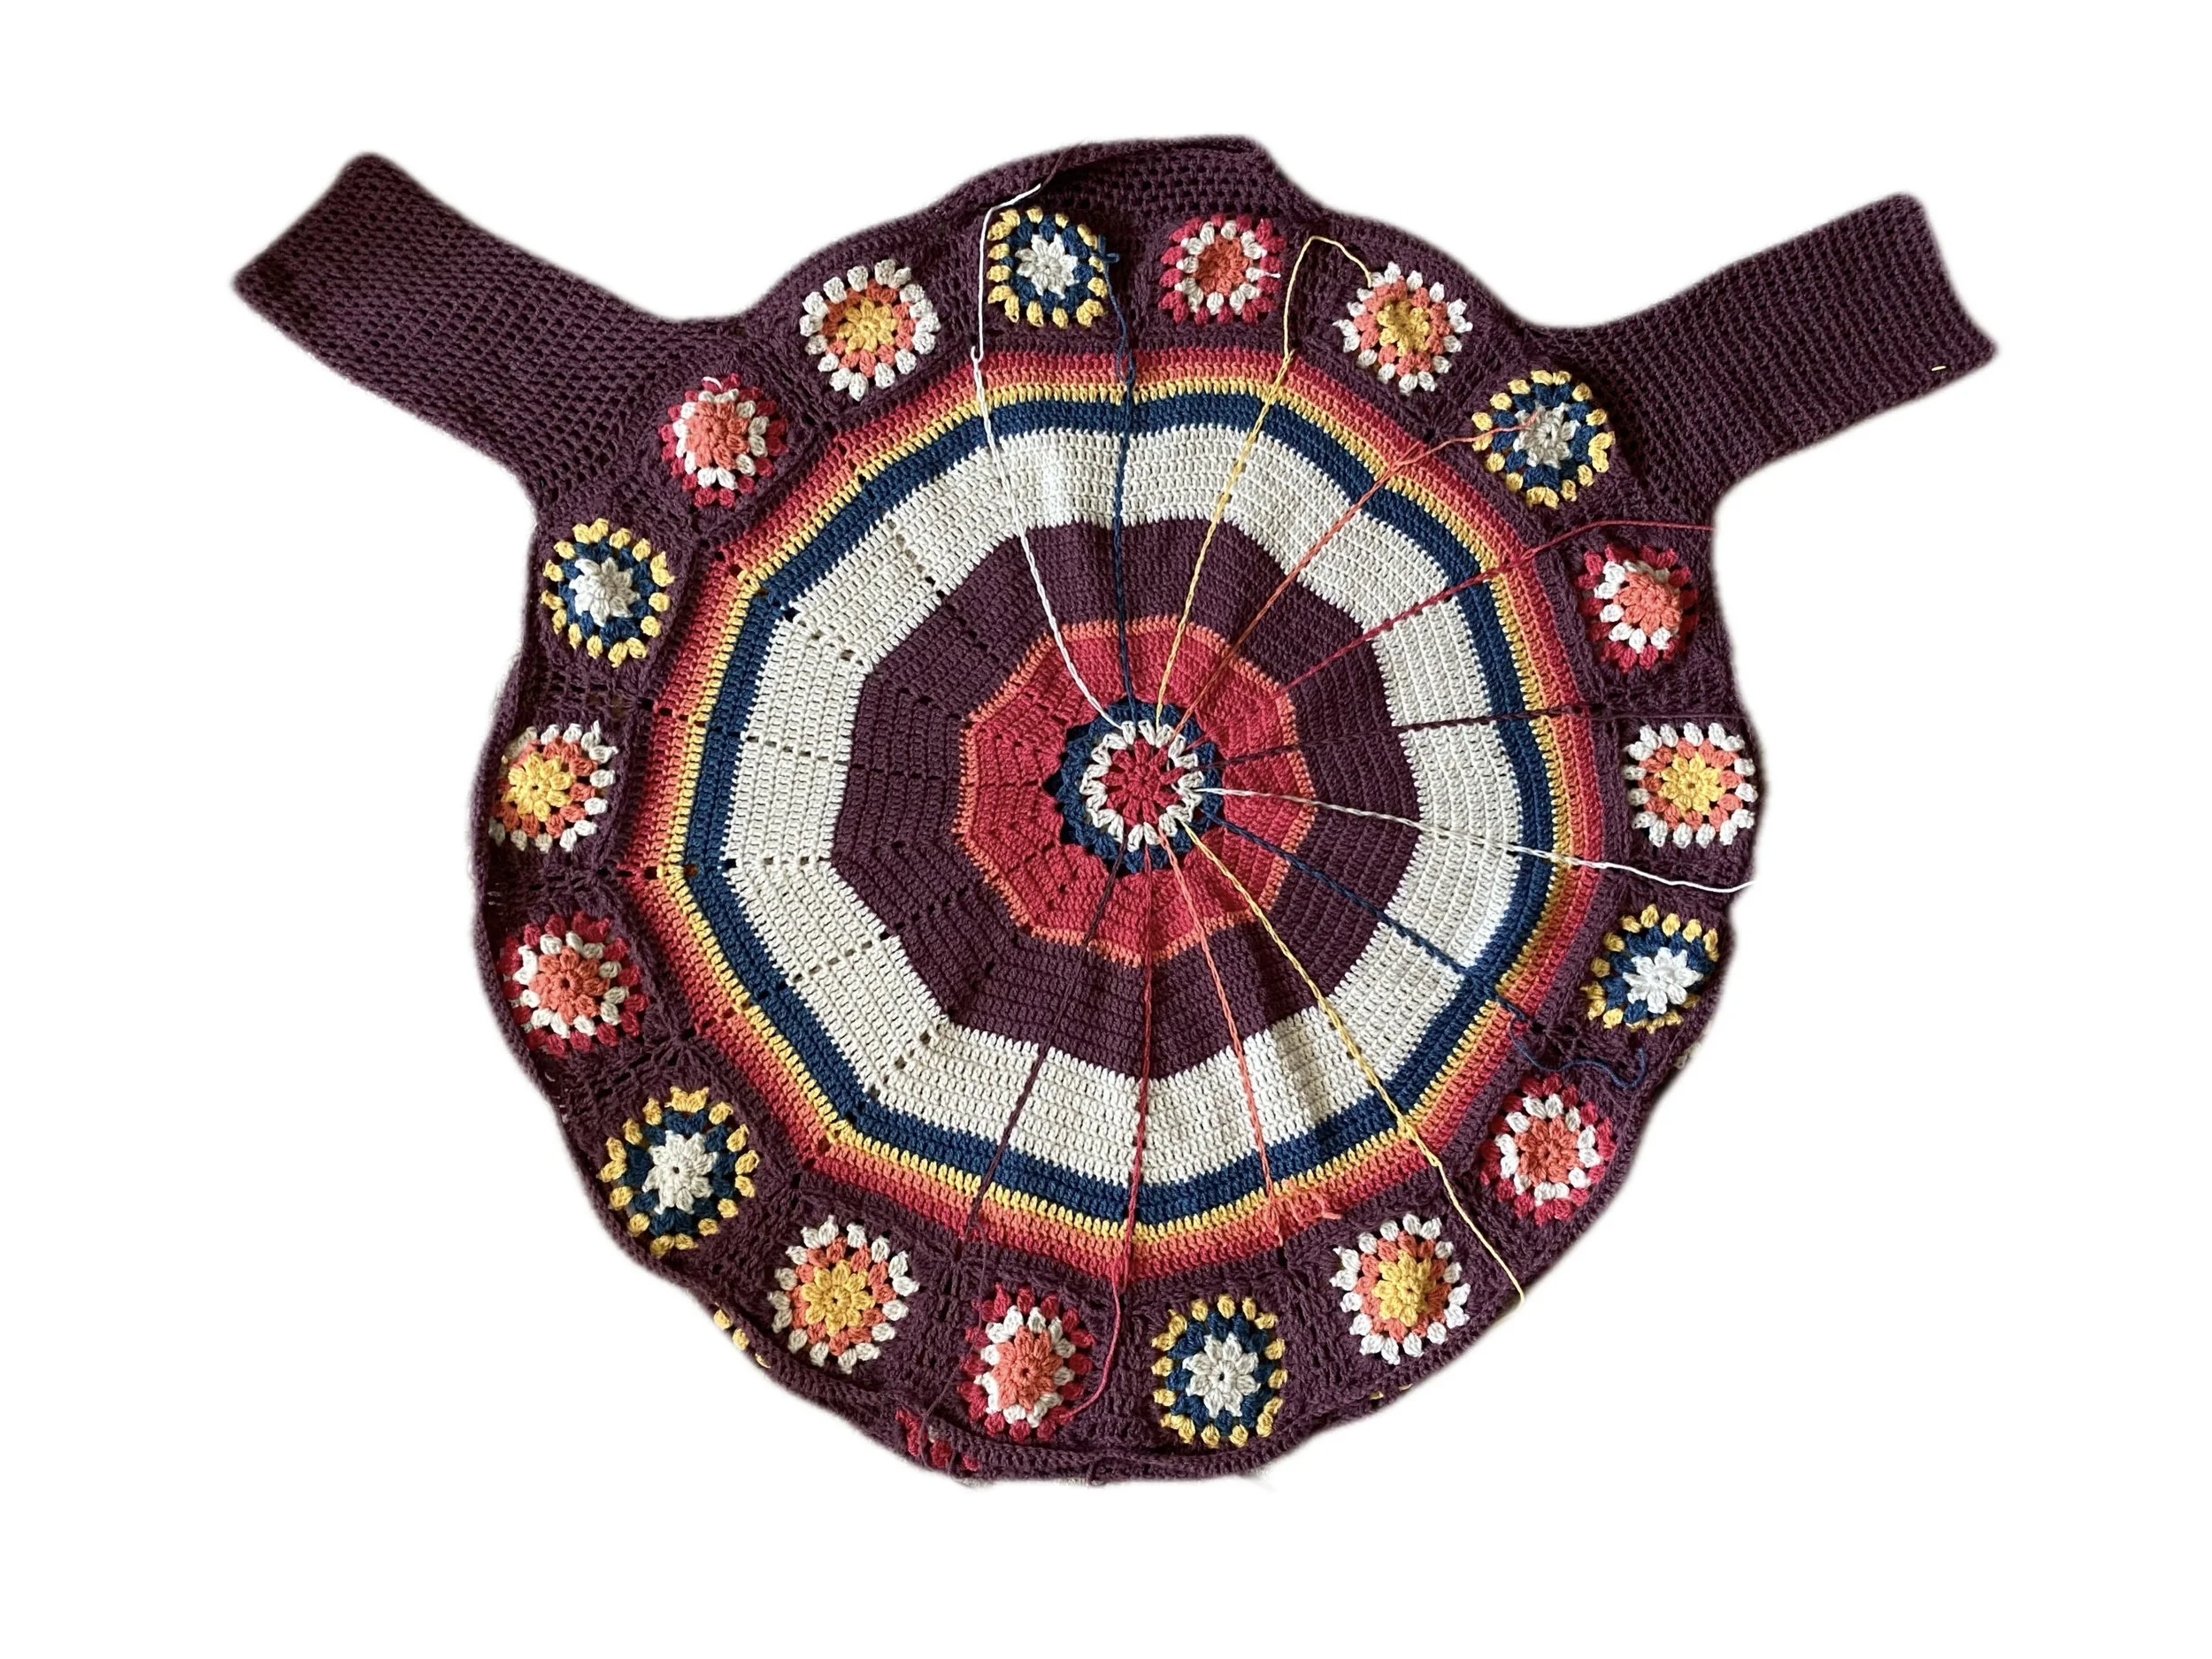
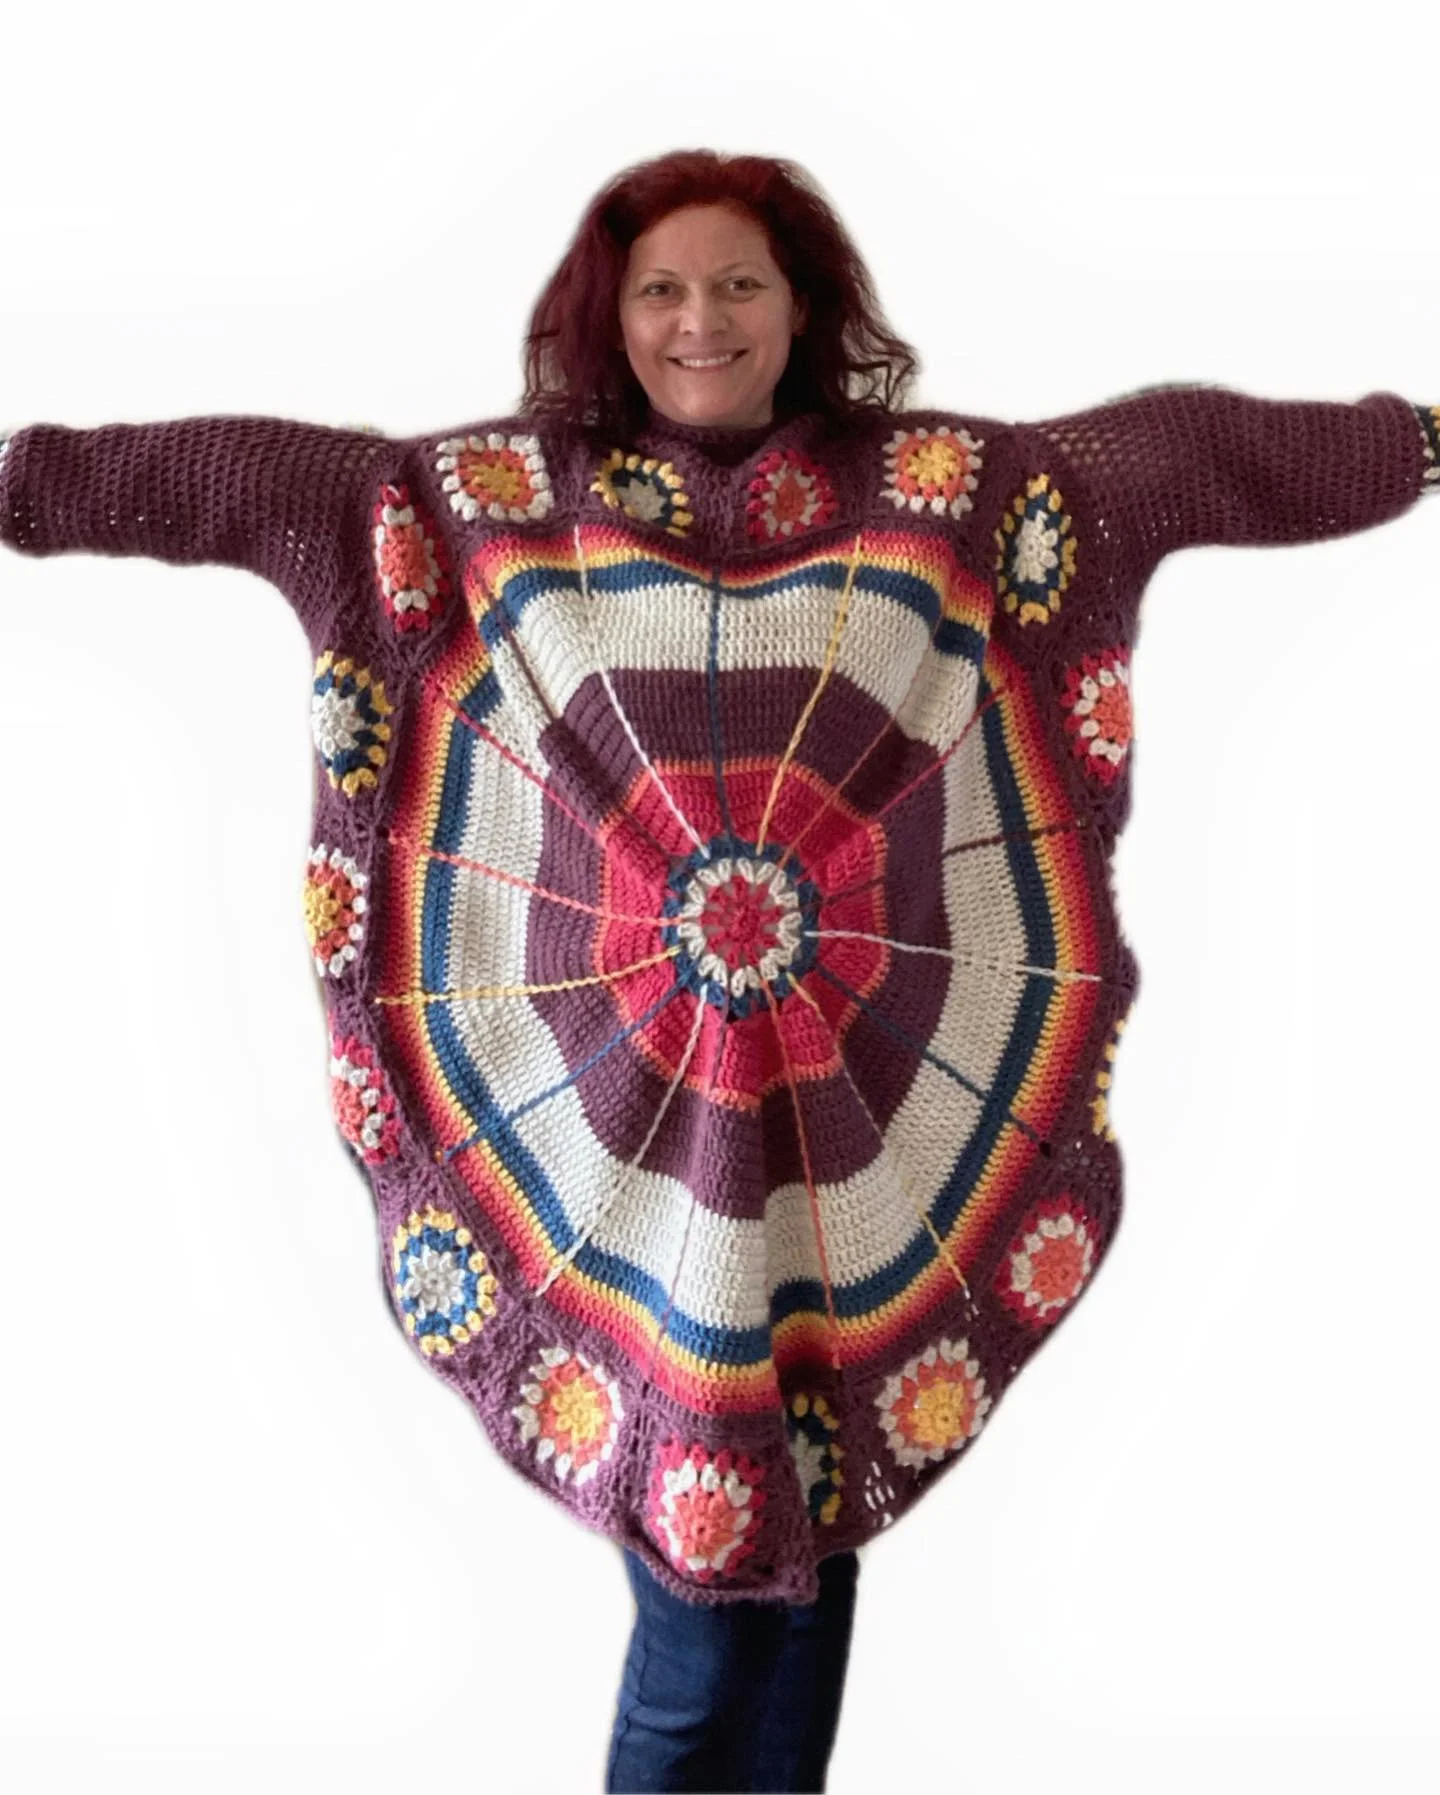
Beach Bonfire Poncho
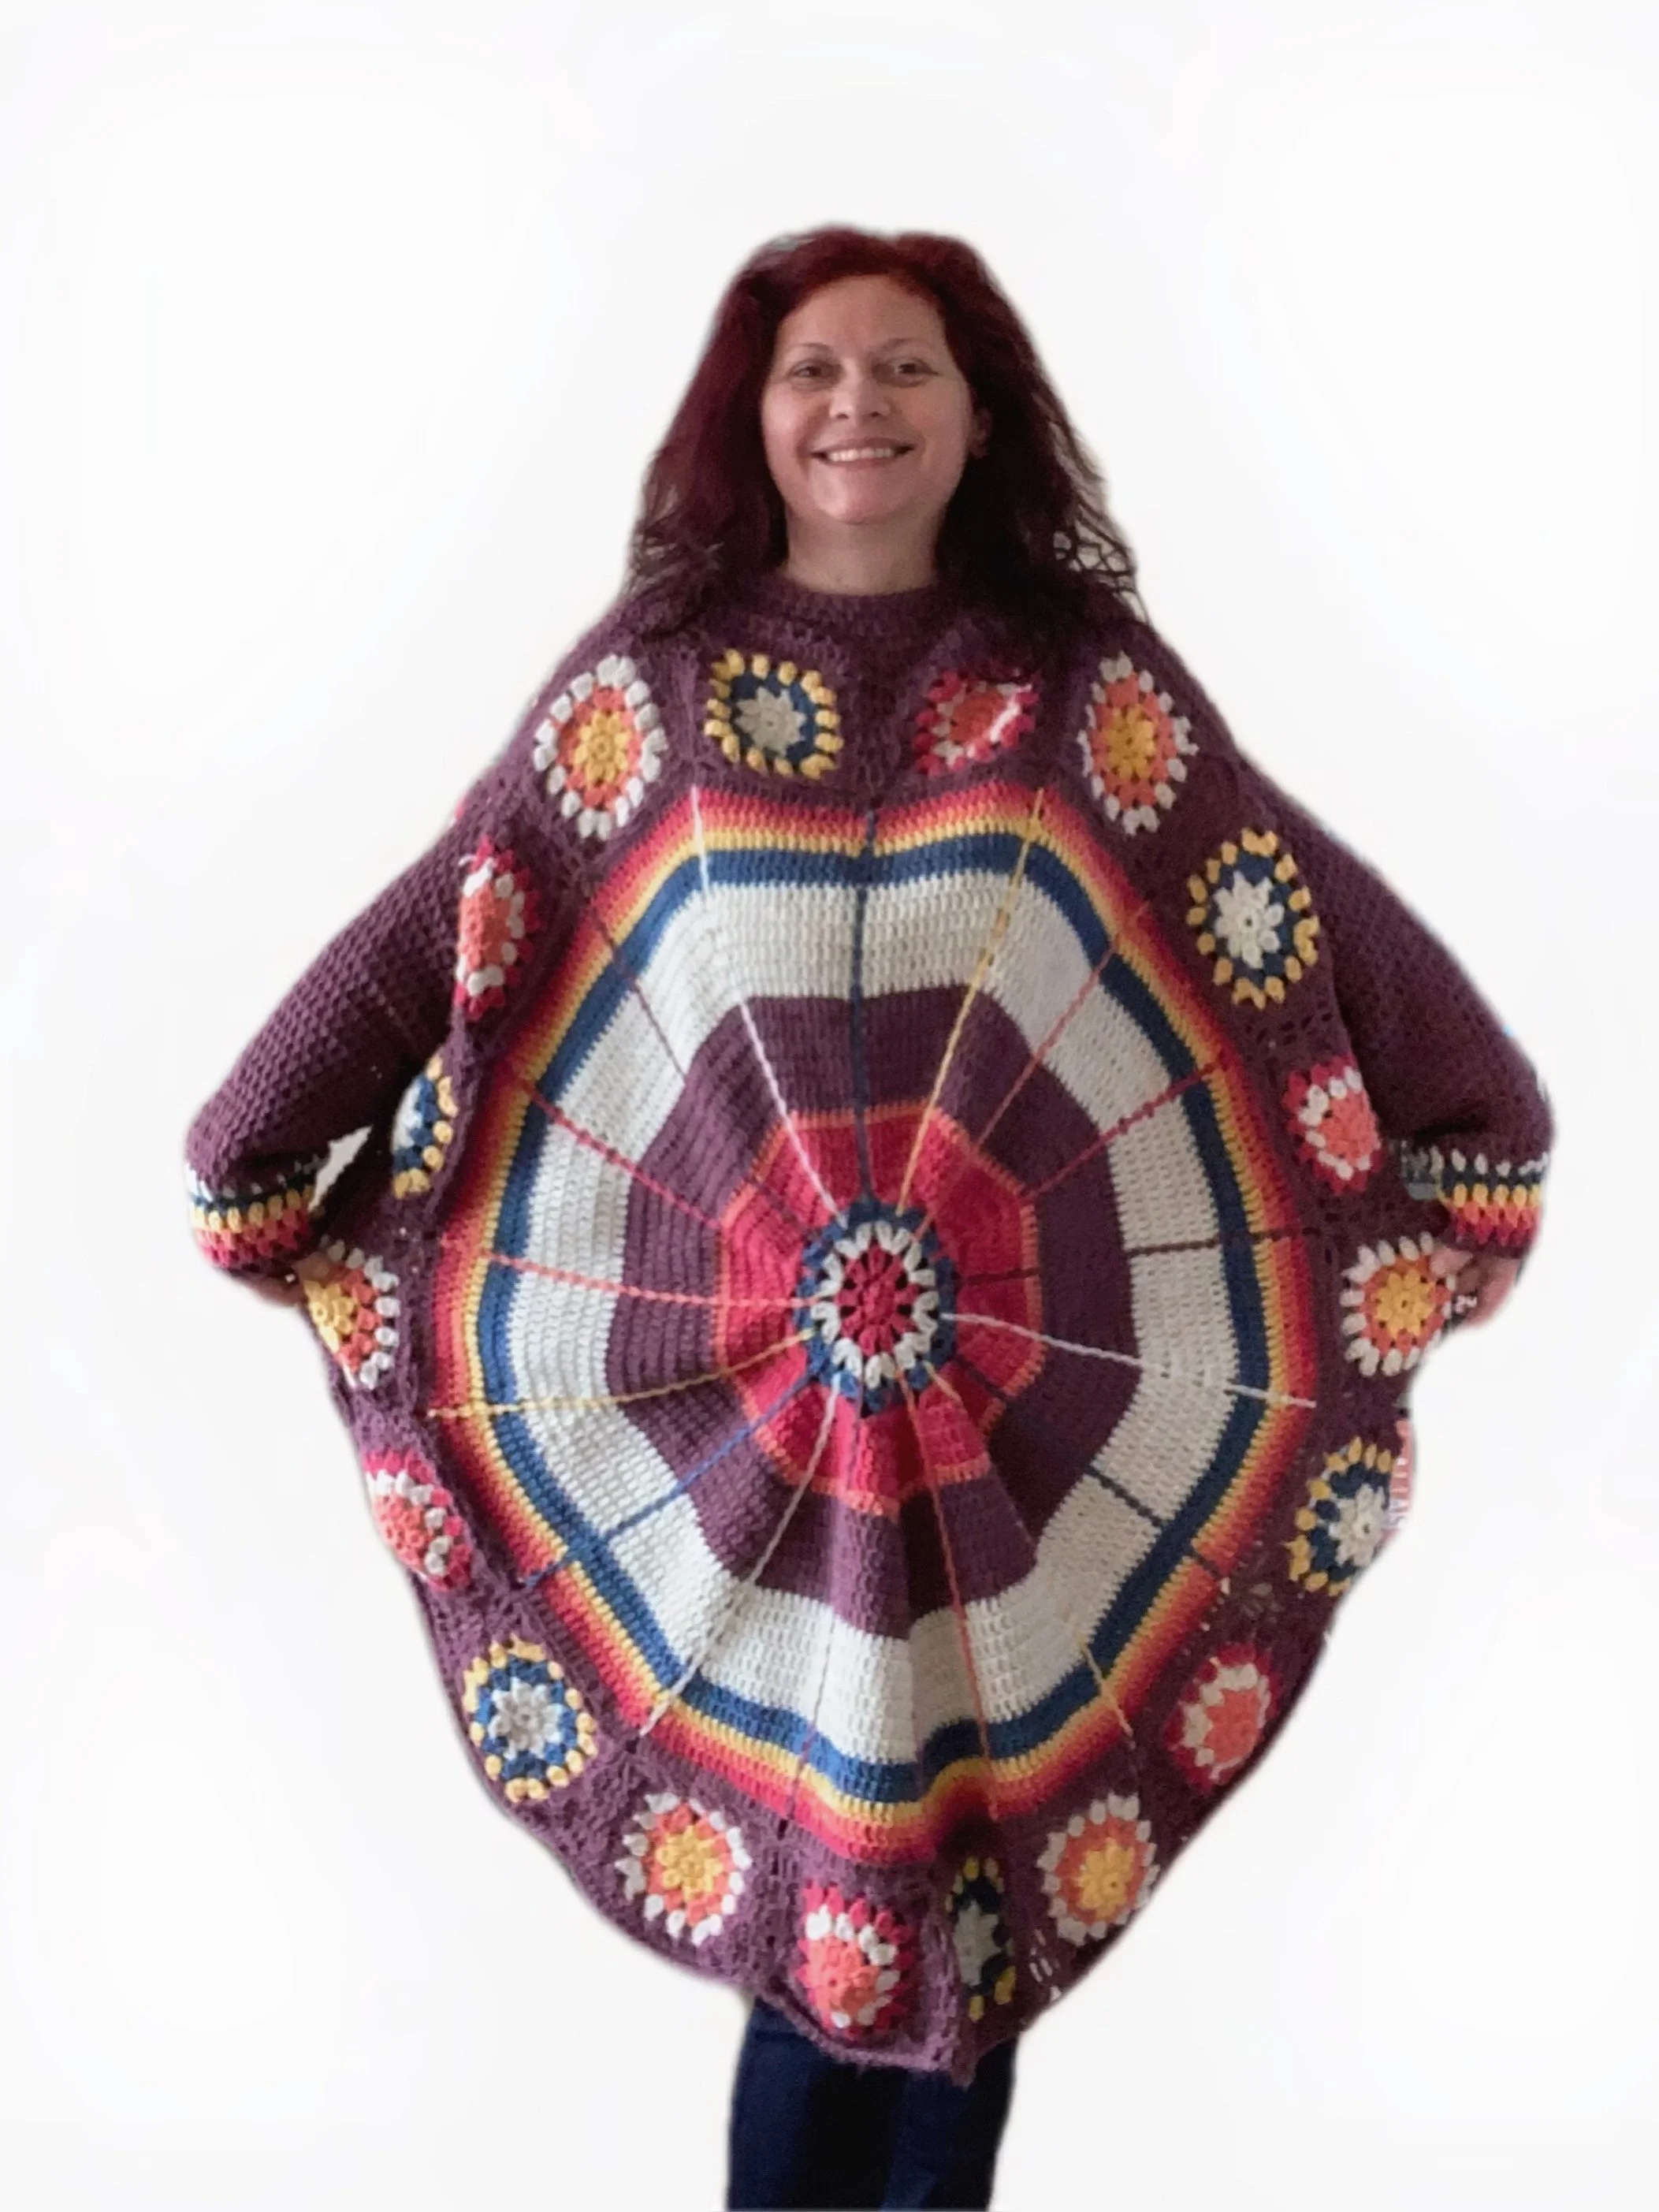
Introducing the Beach Bonfire Poncho. This is by far the most comfortable garment I have ever designed. It is thick (DK), soft, spacious and light at the same time. The pattern fits sizes from 12-18.
The pattern and instructions are both in UK and USA terminology.
Y
Instructions
Yarn
Mariner dk
Off white 170g = 500m
Coral – 100 – 300m -
Blue – 100g – 300m
Utopia Crafts Perfect Dk
Plum – 300 g – 900 m
Red – 100g – 300m
Yellow – 100 g – 300 m
Hook used
4mm
Tension/ gauge
Please see dimensions below
Crochet level
Advanced
Size to fit
One size – fits 12-18 Uk size women
Resizing
If you would like to make the poncho smaller make sure you use 4ply yarn and 3mm size hook.
Measurements
Circle – 102 cm one side – around 204 cm
Sleeves – 32cm
Border of sleeve - 9cm
Width of sleeve 16 cm
Collar – width 30cm height 6cm
1 motif measures: 13 cm
Diagram of Measurements
Diagram of Measurements
The poncho is worked in few phases:
1. Pink – the base of the poncho
2. Square motifs and joining square motifs to base and between each other
3. Collar and sleeves openings and shoulder join
4. Collar and sleeves
5. Surface slip stitch
Special stitches used
Stitch
USA terminology
UK terminology in BOLD
Sc/dc
Single crochet sc
Double crochet dc
Slip stitch
Sl st
Sl stitch
Dc/tc
Double crochet dc
Treble crochet tc
Hdc/htc
Half double crochet hdc
Half treble crochet
Cluster st
3dc cluster st
3tc cluster st
Chain
Ch
ch
Granny st
3dc, ch 1
3tc, ch 1
Granny corner
3dc, ch 3, 3dc
3tc, ch3, 3tc
Mesh pattern
Dc, ch 1, skip 1
Tc, ch 1, skip 1
Surface slip stitch
Surface slip stitch
Surface slip stitch
Almond stitch
Pattern below
The Almond stitch radiates sophistication to any crochet item whether you use single colour or a spectre of colours. The stitch can be used for women’s and men’s scarfs, hats, blankets, cardigans, jumpers and so on.
Written pattern
The Almond stitch consists of 2 unfinished treble crochet
Yarn over, pool through 2 and leave 2 loops on the hook, yarn over again, pool through 2 loops only, pool through the remaining 3 stitches.
Written pattern
Row
USA terminology
UK terminology
Foundation chain multiples of 2+5
1.
Make almond stitch in the 5th chain from the hook
(Ch 1, skip 1 chain
Make almond stitch in the next chain)repeat until the end of the row ending with dc
Make almond stitch in the 5th chain from the hook
(Ch 1, skip 1 chain
Make almond stitch in the next chain)repeat until the end of the row ending with tc
2.
Ch 2, and turn your work
(Make almond st in the first ch space, ch 1, skip 1 almond stitch) repet until the last st
Dc in the last st
Ch 2, and turn your work
(Make almond st in the first ch space, ch 1, skip 1 almond stitch) repet until the last st
tc in the last st
Note:
If worked in the round the start and end blend the almond stitch with ch 1 and dc in not needed.
Note:
If worked in the round the start and end blend the almond stitch with ch 1 and tc in not needed.
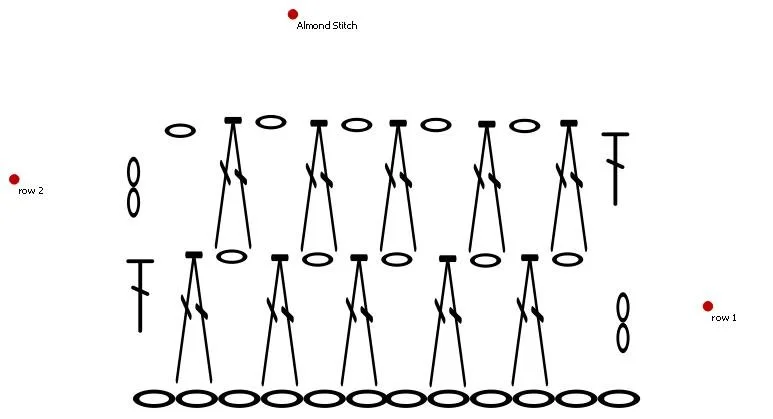
Almond stitch diagram
Whatever it is, the way you tell your story online can make all the difference.
Written instructions for The Beach Bonfire Poncho
1. Body of the poncho

Body of the poncho
Row/colour
USA terminology
UK terminology
1
Red
Ch 5 and slip st into the first ch to make a ring
Make 9 hdc in the ring
Sl stitch into the first hdc
Ch 5 and slip st into the first ch to make a ring
Make 9 htc in the ring
Sl stitch into the first htc
2
Red
Make 2 dc in each st – chain 3 between 2 dc
Make 2 tc in each st – chain 3 between 2 tc
3 beige
Attach the yarn in ch space
2 dc, ch 2, 2 dc in each chain space
Attach the yarn in ch space
2 tc, ch 2, 2 tc in each chain space
4 blue
Attach the yarn in ch space
3 dc, ch 2, 3 dc in each chain space
Attach the yarn in ch space
3 tc, ch 2, 3 tc in each chain space
5 red
Attach the yarn in ch space
Work 4 dc, ch 2, 4 dc in each ch space – repeat 9 times in total
Attach the yarn in ch space
Work 4 tc, ch 2, 4 tc in each ch space – repeat 9 times in total
6 red
Work dc, ch 2 dc in ch spaces
Dc in each dc in previous row – repeat 9 times in total
You now have 5 dc between the chain spaces
(Work tc, ch 2 tc in ch spaces
tc in each dc in previous row) – repeat 9 times in total
You now have 5 tc between the chain spaces
7 red
Work dc, ch 2 dc in ch space
Dc in each dc in previous row – repeat 9 times in total
You now have 6 dc between ch spaces
Work tc, ch 2 tc in ch space
tc in each dc in previous row – repeat 9 times in total
You now have 6 tc between ch spaces
8 red
Work dc, ch 2 dc in ch space
Dc in each dc in previous row – repeat 9 times in total
You now have 7 dc between ch spaces
Work tc, ch 2 tc in ch space
tc in each tc in previous row – repeat 9 times in total
You now have 7 tc between ch spaces
9 coral
Do not work in the ch spaces
Make 7 dc in the dc in previous row and ch 2 where the ch spaces are
You still have 7 dc between ch spaces
Do not work in the ch spaces
Make 7 tc in the tc in previous row and ch 2 where the ch spaces are
You still have 7 tc between ch spaces
10 plum
Work dc, ch 2 dc in ch space
Dc in each dc in previous row – repeat 9 times in total
You now have 8 dc between ch spaces
Work tc, ch 2 tc in ch space
tc in each tc in previous row – repeat 9 times in total
You now have 8 tc between ch spaces
11 plum
Work dc, ch 2 dc in ch space
Dc in each dc in previous row – repeat 9 times in total
You now have 9 dc between ch spaces
Work tc, ch 2 tc in ch space
tc in each dc in previous row – repeat 9 times in total
You now have 9 tc between ch spaces
12 plum
Do not work in the ch spaces
Make 9 dc in the dc in previous row and ch 2 where the ch spaces are
You still have 9 dc between ch spaces
Do not work in the ch spaces
Make 9 tc in the tc in previous row and ch 2 where the ch spaces are
You still have 9 tc between ch spaces
13 plum
Work dc, ch 2 dc in ch space
Dc in each dc in previous row – repeat 9 times in total
You now have 10 dc between ch spaces
Work tc, ch 2 tc in ch space
tc in each dc in previous row – repeat 9 times in total
You now have 10 tc between ch spaces
14 plum
Work dc, ch 2 dc in ch space
Dc in each dc in previous row – repeat 9 times in total
You now have 11 dc between ch spaces
Work tc, ch 2 tc in ch space
tc in each dc in previous row – repeat 9 times in total
You now have 11 tc between ch spaces
15 plum
Do not work in the ch spaces
Make 11 dc in the dc in previous row and ch 2 where the ch spaces are
You still have 11 dc between ch spaces
Do not work in the ch spaces
Make 11 tc in the tc in previous row and ch 2 where the ch spaces are
You still have 11 tc between ch spaces
16 beige
Work dc, ch 2 dc in ch space
Dc in each dc in previous row – repeat 9 times in total
You now have 12 dc between ch spaces
Work tc, ch 2 tc in ch space
tc in each dc in previous row – repeat 9 times in total
You now have 12 tc between ch spaces
17 beige
Do not work in the ch spaces
Make 12 dc in the dc in previous row and ch 2 where the ch spaces are
You still have 12 dc between ch spaces
Do not work in the ch spaces
Make 12 tc in the tc in previous row and ch 2 where the ch spaces are
You still have 12 tc between ch spaces
18 beige
Work dc, ch 2 dc in ch space
Dc in each dc in previous row – repeat 9 times in total
You now have 13 dc between ch spaces
Work tc, ch 2 tc in ch space
tc in each dc in previous row – repeat 9 times in total
You now have 13 tc between ch spaces
19 beige
Do not work in the ch spaces
Make 13 dc in the dc in previous row and ch 2 where the ch spaces are
You still have 13 dc between ch spaces
Do not work in the ch spaces
Make 13 tc in the tc in previous row and ch 2 where the ch spaces are
You still have 13 tc between ch spaces
20 beige
Work dc, ch 2 dc in ch space
Dc in each dc in previous row – repeat 9 times in total
You now have 14 dc between ch spaces
Work tc, ch 2 tc in ch space
tc in each tc in previous row – repeat 9 times in total
You now have 14 tc between ch spaces
21 beige
Do not work in the ch spaces
Make 14 dc in the dc in previous row and ch 2 where the ch spaces are
You still have 14 dc between ch spaces
Do not work in the ch spaces
Make 14 tc in the tc in previous row and ch 2 where the ch spaces are
You still have 14 tc between ch spaces
22 blue
Work dc, ch 2 dc in ch space
Dc in each dc in previous row – repeat 9 times in total
You now have 15 dc between ch spaces
Work tc, ch 2 tc in ch space
tc in each tc in previous row – repeat 9 times in total
You now have 15 tc between ch spaces
23 blue
Do not work in the ch spaces
Make 15 dc in the dc in previous row and ch 2 where the ch spaces are
You still have 15 dc between ch spaces
Do not work in the ch spaces
Make 15 tc in the tc in previous row and ch 2 where the ch spaces are
You still have 15 tc between ch spaces
24 yellow
Work dc, ch 2 dc in ch space
Dc in each dc in previous row – repeat 9 times in total
You now have 16 dc between ch spaces
Work tc, ch 2 tc in ch space
tc in each dc in previous row – repeat 9 times in total
You now have 16 tc between ch spaces
25 coral
Do not work in the ch spaces
Make 16 dc in the dc in previous row and ch 2 where the ch spaces are
You still have 16 dc between ch spaces
Do not work in the ch spaces
Make 16 tc in the tc in previous row and ch 2 where the ch spaces are
You still have 16 tc between ch spaces
26 red
Work dc, ch 2 dc in ch space
Dc in each dc in previous row – repeat 9 times in total
You now have 17 dc between ch spaces
Work tc, ch 2 tc in ch space
tc in each dc in previous row – repeat 9 times in total
You now have 17 tc between ch spaces
27 plum
Work dc, ch 2 dc in ch space
Dc in each dc in previous row – repeat 9 times in total
You now have 18 dc between ch spaces
Work tc, ch 2 tc in ch space
tc in each dc in previous row – repeat 9 times in total
You now have 18 tc between ch spaces
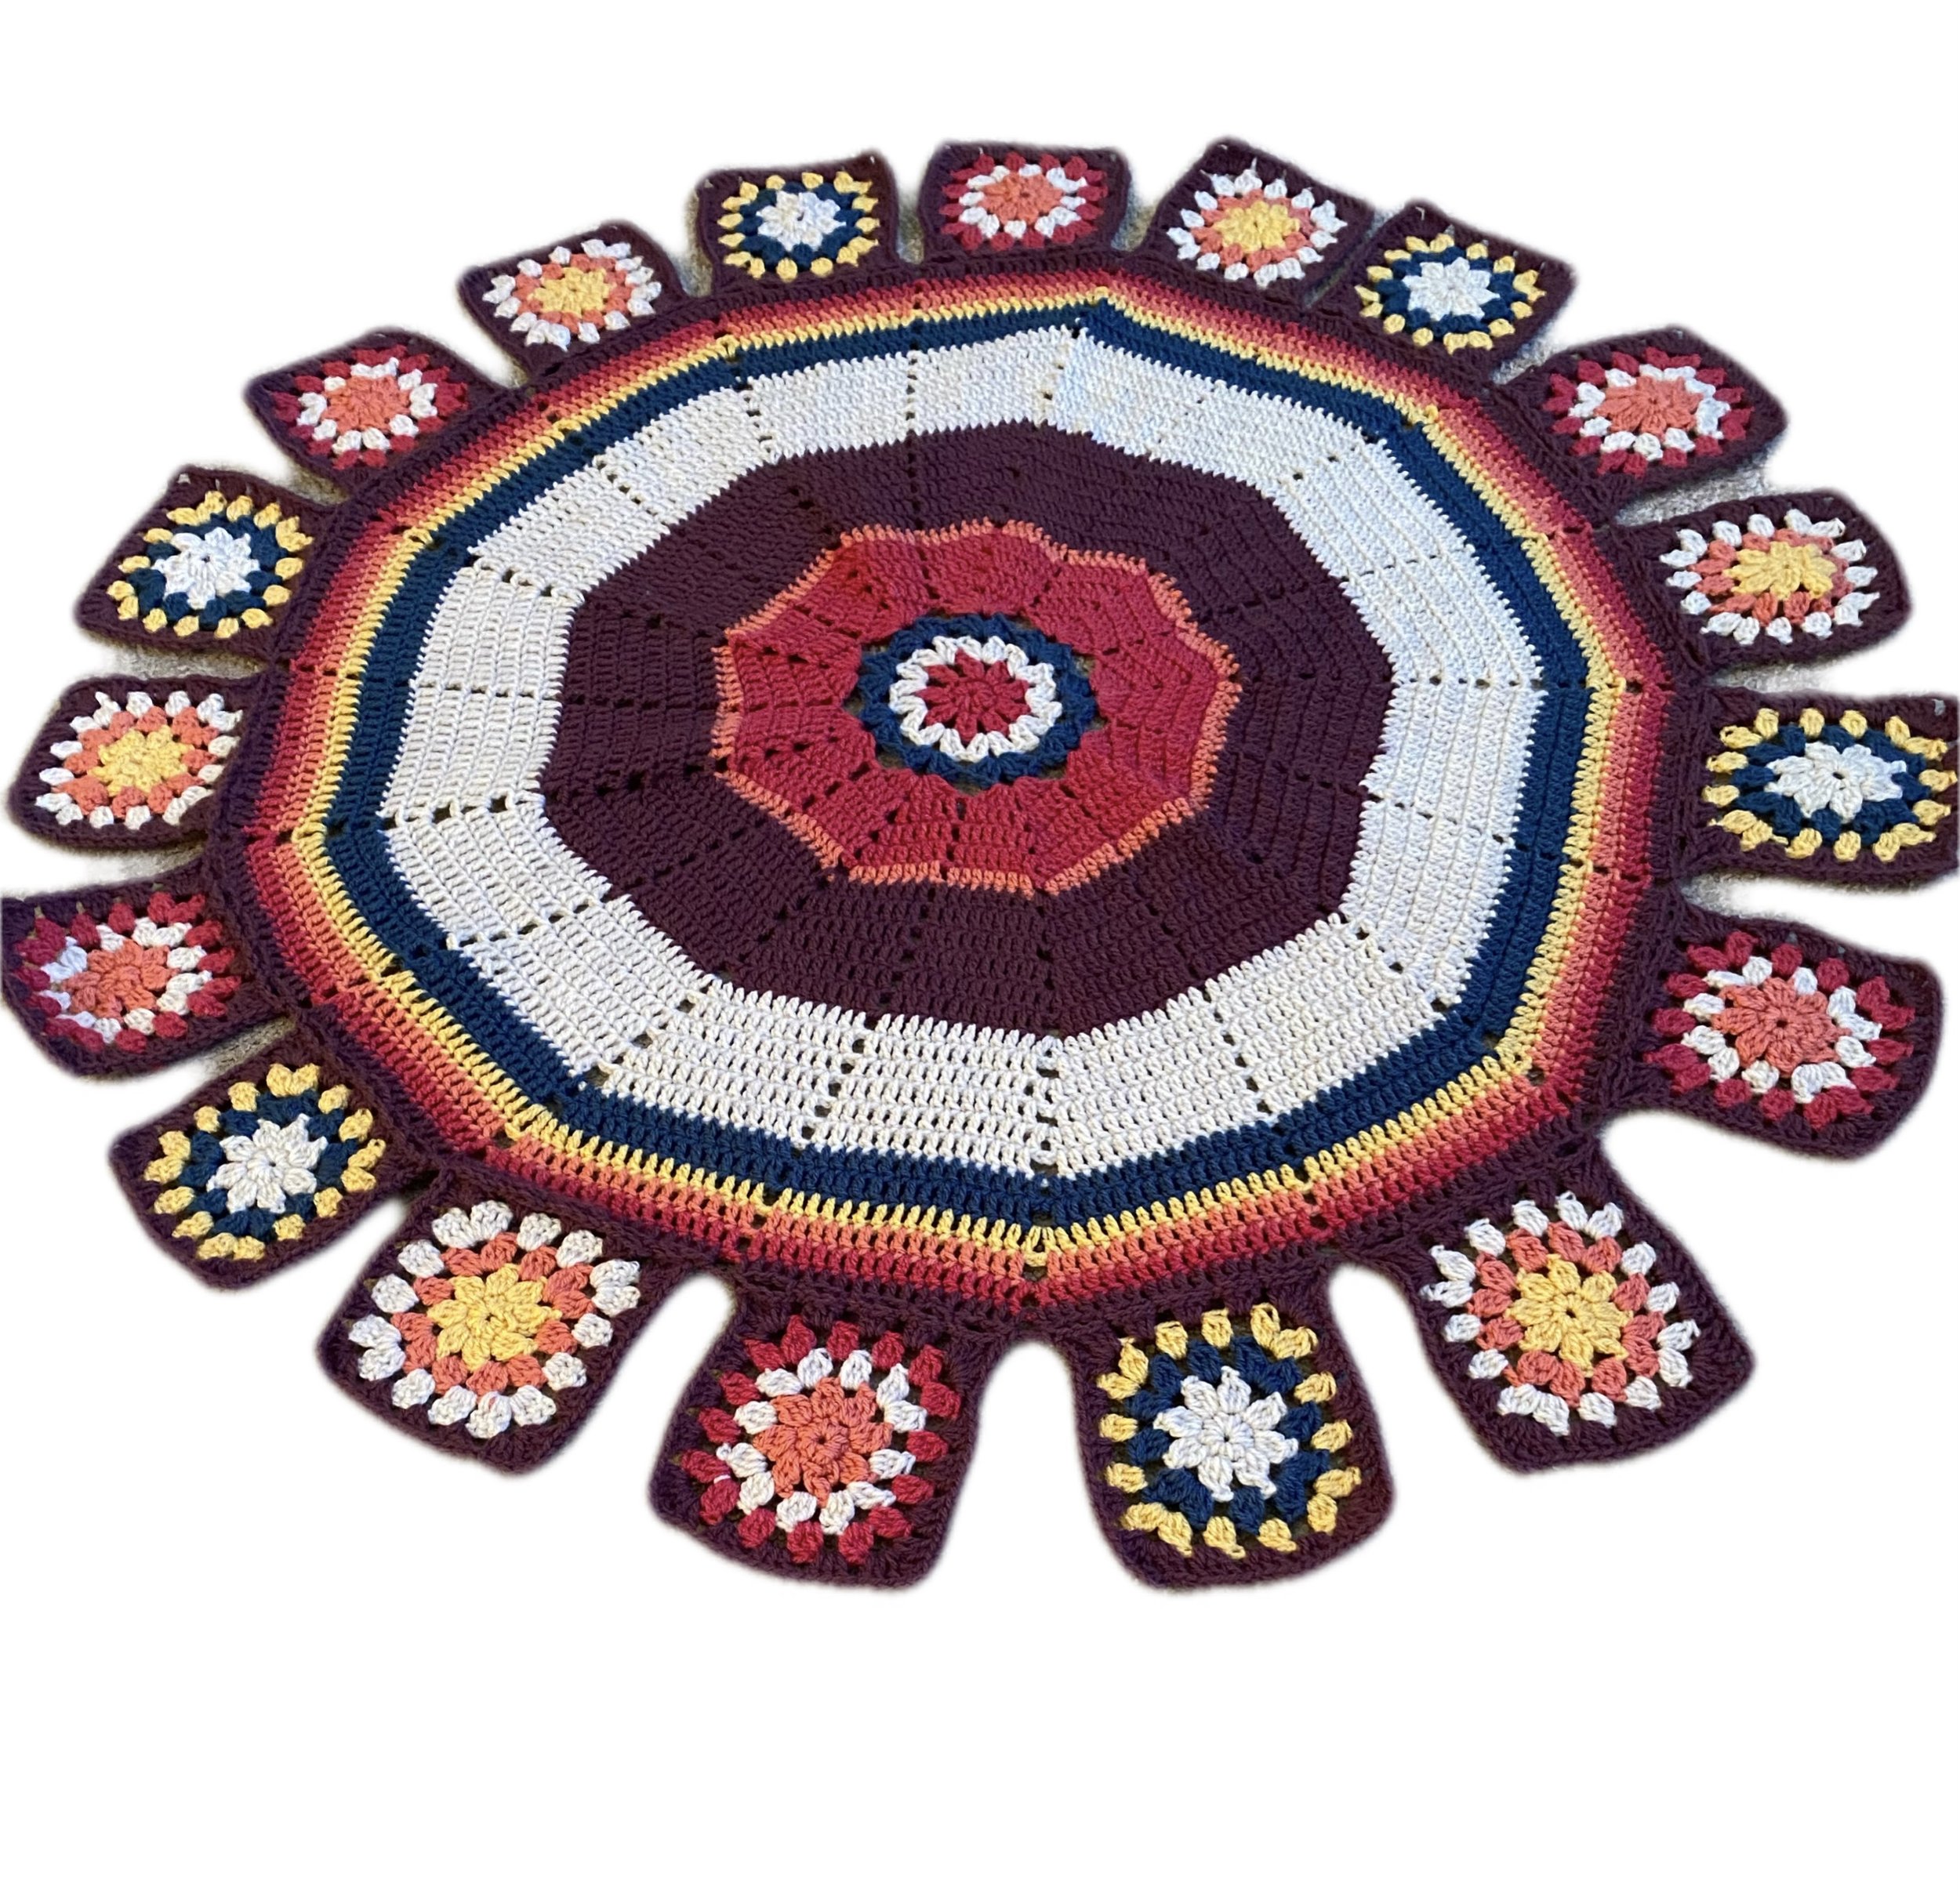
Make 2 – one for the front and one for the back of the poncho
Diagram of the pattern is shown below
Body of the Poncho Diagram
1. Square motifs
Square motifs
Round
USA terminology
UK terminology
Colours
1 motif – yellow 2 rows, coral, off white – make 12
2 motif – off white 2 rows, blue, yellow – make 12
3 motif – coral, off white, red – make 12
Chain 5 and make a ring by slip stitching the first ch
1
Make 8 hdc in the ring
Make 8 htc in the ring
2
Make 3dc cluster in hdc and ch 3 – repeat this pattern for 8 times in total
Make 3tc cluster in htc and ch 3 – repeat this pattern for 8 times in total
3
(3hdc, ch 3, 3 hdc to make a corner
Ch 2
3dc cluster in next ch space)
repeat 4 times in total
(3htc, ch 3, 3 htc to make a corner
Ch 2
3tc cluster in next ch space)
repeat 4 times in total
4
Granny st corner
And granny st row
(in corner - 3dc, ch 3 3 dc
ch 1, 3 dc in the next ch space)
Repeat 4 times for all 4 corners and sides
Granny st corner
And granny st row
(In corner -3tc, ch 3 3 tc
ch 1, 3 tc in the next ch space)
Repeat 4 times for all 4 corners and sides
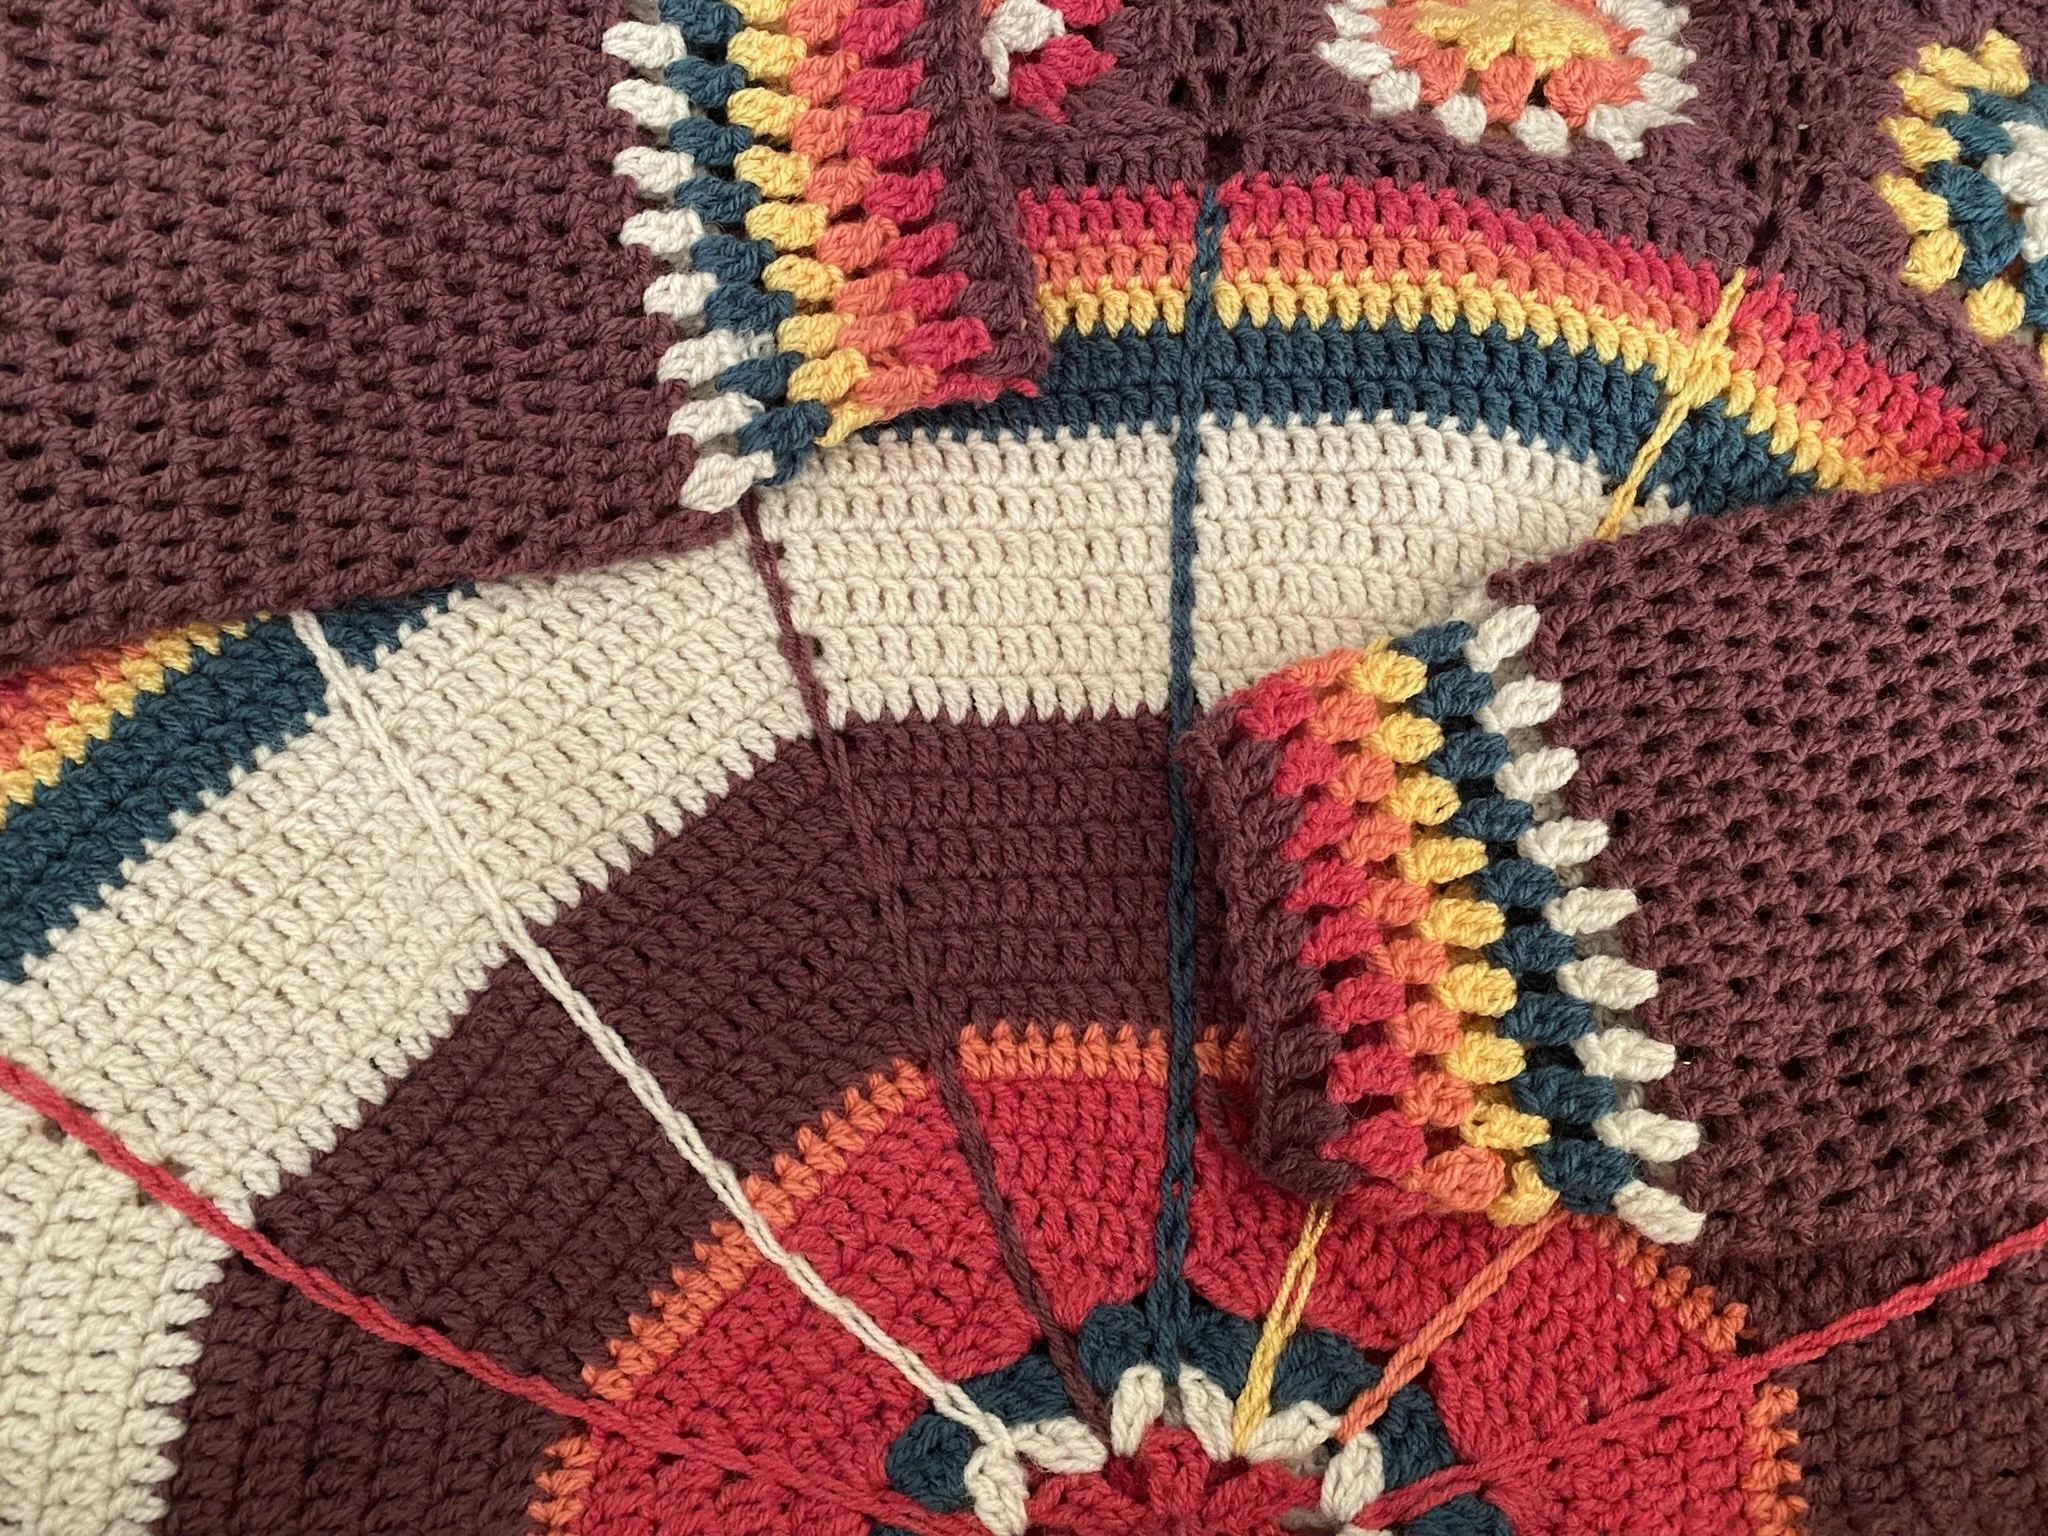
Attaching the motifs to the body of the poncho
Option 1
Join as you go method with granny stitch row - same as row 4 – only one side we slip st as shown below with black
Diagram of motif and points of slip stitch to the body of the poncho
Round 5
Corner – make 3 dc, ch 1, slip stitch at point 1 (the chain 2 between 2 sections of the body), make 3 more dc in the same ch space of the motif to make the corner
Skip 4 st stitches in the body of the poncho, slip stitch in the space between the 4 and 5 st (point 2),
Make 3 dc,
Skip 3 st in the body of the poncho slip st between 7and 8 st (point 3) make 3 dc in the motif
Make 3 dc on the motif and
Skip 4 dc in the body of the poncho and slip st (point 4) in between 11 ans 12 st in the body of the poncho
Make 3 dc in the motif and skip 3 st in the body of the poncho (point 5)
Make 3 dc, and skip 4 st in the body of the poncho, slip st (point 6)
Ch 3, make 3 dc to finish the corner of the motif
Corner – make 3 tc, ch 1, slip stitch at point 1 (the chain 2 between 2 sections of the body), make 3 more tc in the same ch space of the motif to make the corner
Skip 4 st stitches in the body of the poncho, slip stitch in the space between the 4 and 5 st (point 2),
Make 3 tc,
Skip 3 st in the body of the poncho slip st between 7and 8 st (point 3) make 3 tc in the motif
Make 3 dc on the motif and
Skip 4 tc in the body of the poncho and slip st (point 4) in between 11 ans 12 st in the body of the poncho
Make 3 tc in the motif and skip 3 st in the body of the poncho (point 5)
Make 3 tc, and skip 4 st in the body of the poncho, slip st (point 6)
Ch 3, make 3tc to finish the corner of the motif
Option 2
Use any method that you are familiar to join the motifs to the body of the poncho in the designated sections – chain space to chain space.
Rounds after attaching all motifs to the body of the poncho
Before we can join neighbouring motifs together, we need to make one round of single/double crochet to each stitch.
Round 1 Make sc/dc in each stitch (skipping the ch1 spaces between granny st)
In between two motifs chain 3.
Round 2 – make dc/ tc in each stitch
In ch 3 between each motif make 2 dc/tc, ch 2, 2dc/tc.
Joining the gaps between the motifs
Round
USA terminology
UK terminology
Attach the yarn in the ch space between two motifs – see diagram below
1
Red on diagram below
Ch 2 – counts as dc
Slip st in the ch space of the motif after the corner
Ch 1, turn your work
Make another dc in the ch space of the body of the poncho
Slip stitch in the chain space on the other motif after the corner
Ch 2 – counts as tc
Slip st in the ch space of the motif after the corner
Ch 1, turn your work
Make another tc in the ch space of the body of the poncho
Slip stitch in the chain space on the other motif after the corner
2
blue on diagram below
Ch 2 – counts as dc
Slip stitch in the next ch space of the motif
Ch 1
Make dc in the ch space in previous row
Ch 1
Make a dc in the last ch space
Slip st in the next ch space on the motif
Ch 2 – counts as tc
Slip stitch in the next ch space of the motif
Ch 1
Make tc in the ch space in previous row
Ch 1
Make a tc in the last ch space
Slip st in the next ch space on the motif
3
green on diagram below
Ch 2, counts as dc
Slip st in the next ch space of the motif
Ch1, dc, ch 1, dc , ch 1 , dc in the last ch space
Slip st in the next ch space of the motif
Ch 2, counts as tc
Slip st in the next ch space of the motif
Ch1, tc, ch 1,tc , ch 1 , dc in the last ch space
Slip st in the next ch space of the motif
4
pink in the diagram below
Ch 2, counts as dc
Slip st in the next ch space of the motif
Ch1, dc, ch 1, dc , ch 1 , dc, ch 1, dc in the last ch space
Slip st in the next ch space of the motif
Ch 2, counts as tc
Slip st in the next ch space of the motif
Ch1, tc, ch 1, tc , ch 1 , tc, ch 1,tc in the last ch space
Slip st in the next ch space of the motif
5
Yellow in the diagram below
Ch 2, slip stitch in the corner of the motif,
Slip st again in between 2 stitches in the round after the motifs
Dc in the ch space below
Skip 1 in the round after the motifs and slip st between the next 2 st
Dc in the ch space below
Skip 1 in the round after the motifs and slip st between the next 2st
Dc in the ch space below
Skip 1 in the round after the motifs and slip st between the next 2 st
Dc in the ch space below
slip st in the corner of the motif.
Ch 2, slip stitch in the corner of the motif,
Slip st again in between 2 stitches in the round after the motifs
tc in the ch space below
Skip 1 in the round after the motifs and slip st between the next 2 st
tc in the ch space below
Skip 1 in the round after the motifs and slip st between the next 2 st
tc in the ch space below
Skip 1 in the round after the motifs and slip st between the next 2 st
tc in the ch space below
slip st in the corner of the motif.
Red row 1
Blue row 2
Green row 3
Purple row 4
Yellow row 5
Neck opening, shoulders and sleeves opening
Place both front and back panel with the right side facing each other. Mark with stitch markers as presented below:
Once this is done connect the next 2 motifs (on each side) below the sleeves to complete the poncho. Photo shown below:
Collar pattern
Once we have joined the shoulders, we need to start working on the collar of the neck opening.
Round
USA terminology
UK terminology
Mesh pattern
Dc, ch 1, skip 1 – repeat pattern
tc, ch 1, skip 1 – repeat pattern
1-5
plum
Attach the yarn at any stitch. I have attached it under the arm.
Ch 2 – counts as dc, dc in the next st, (ch 1, skip 1, dc in the next st)
Repeat this pattern all around. When you reach the first 2 dc, ch 1 and make dc in between the first 2 dc – place a marker as this is the start of the second round.
(Ch 1, skip dc, dc in the ch space below) repeat the pattern until you have finished 5 rounds.
Attach the yarn at any stitch. I have attached it under the arm.
Ch 2 – counts as tc, tc in the next st, (ch 1, skip 1, tc in the next st)
Repeat this pattern all around. When you reach the first 2 tc, ch 1 and make tc in between the first 2 dc – place a marker as this is the start of the second round.
(Ch 1, skip tc, tc in the ch space below) repeat the pattern until you have finished 5 rounds.
Sleeve holes and sleeves pattern
Round
USA terminology
UK terminology
Mesh pattern
Dc, ch 1, skip 1
tc, ch 1, skip 1
1- 26
plum
Attach the yarn at any stitch.
Ch 2 – counts as dc, dc in the next st, (ch 1, skip 1, dc in the next st)
Repeat this pattern all around. When you reach the first 2 dc, ch 1 and make dc in between the first 2 dc – place a marker as this is the start of the second round.
(Ch 1, skip dc, dc in the ch space below) repeat the pattern until you have finished 26 rounds
Attach the yarn at any stitch.
Ch 2 – counts as tc, tc in the next st, (ch 1, skip 1, tc in the next st)
Repeat this pattern all around. When you reach the first 2 tc, ch 1 and make tc in between the first 2 tc – place a marker as this is the start of the second round.
(Ch 1, skip tc, dc in the ch space below) repeat the pattern until you have finished 26 rounds
27
Off white
Attach the yarn anywhere – I once again attached mine under the arm.
(Make almond stitch ch 1, skip 1) repeat the pattern until you have finished the round.
Cut the yarn and waive the ends.
Attach the yarn anywhere – I once again attached mine under the arm.
(Make almond stitch, ch 1, skip 1) repeat the pattern until you have finished the round.
Cut the yarn and waive the ends.
28 blue
Same as row 27
Same as row 27
29 yellow
Same as row 27
Same as row 27
30 coral
Same as row 27
Same as row 27
31 red
Same as row 27
Same as row 27
32 plum
Same as row 27
Same as row 27
The surface slipstitch is one additional technique used in this pattern. We start slip stitching from round 3 to 27.
Surface slip stitch
The colours when slip stitching are as follows:
Plum, off white, blue, yellow, coral, red and plum.
And you are done!
Happy Crocheting
Gordana x
Comments (0)
Newest First Oldest First Newest First Most Liked Least Liked
Preview Post Comment